MYLOCK - USER GUIDE
NEW IN MYLOCK v1.3
MODIFIED IN THIS VERSION
This information can be useful for users who are currently using version 1.0 and want to upgrade to version 1.3.
Several changes were made in the new version 1.3
There are new component, new examples, new MyPanel and new php scripts.
The concept of instance is added
It refers to an application execution instance, always associated with a Mac-Code that identifies a PC, which in turn is associated with a User.
In version 1.0 of MyLock we had the Machines field that established the number of computers that could be running the application at the same time. This works great for common users, but the problem arises with corporate users who typically install the application on a server and run it over the network from multiple client computers. In this way, the mac-code (unique code of each computer) that identifies each computer is the same for all clients since it is obtained from the server and not from each of the client machines. For this reason, in version 1.3 we no longer count the number of machines that are running, but the number of instances running. To implement this new strategy we have added some new fields to three of the database tables, as can be seen in the image below:

In the APPLICATIONS table we added two fields:
1. INSTANLIFE: This field was added due to a problem that exists to maintain a correct value for the number of PCs that are running (instances). This value increases by one each time an application instance is started and decreases each time the user closes the application. But it is impossible to ensure that the application always closes correctly as the PC may suddenly shut down due to lack of power, or the user may turn off the PC without closing the program, or kill the process, etc. In all these cases in MyPanel we would see that the number of instances running is greater than the real one. The solution I have found to this problem is to establish a life limit for the instances, in this way, before starting an instance again, all the user's instances are analyzed and they are removed from the registry when they have already exceeded their lifetime settled down.
2. MAXINSTANCES: Defines the maximum number of instances. Here it is defined as a default value that will be used to set the maxinstances field of the user record when it is created. Later this value can be modified in each user that requires it.
In the USERS table we add the MAXINSTANCES field that when created takes the value established in the APPLICATIONS table, but can later be modified in order to adjust it to the needs of each user.
In the MACHINES table the INSTANCES field was added, which is used to save the instances that are running at a given moment for each of the mac-code (machines).
Below you can see how instances are saved in this field. Each one is represented by the timestamp of the instant the instance was started. The instances are concatenated thus forming a list of instances. Every time a new instance is attempted to start, the number of instances saved in this field is compared with the MAXINSTANCES field in the USERS table and if the number of running instances has not yet reached the maximum allowed by this field, the new instance is started. otherwise, an error message "No more available instances" appears.

Changes made in MyPanel
In the MAIN DATA panel of the application and in the user data editing form, we have added the fields where we can edit MAXINSTANCES and INSTANLIFE:


Below in the image we can see 4 running instances. A MacCode has two instances and then there are two MacCodes that have one instance each.

If Max Instances of the user is 4, we have already completed the maximum available instances. If we try to start a new instance we would see the following:

When closing we see that the execution cannot continue.

RegData Life: This field already existed in the previous version under the name MacLife. This field was added because users do not always have an internet connection available or sometimes it is defective, but each time the application is started and the data is obtained correctly from the internet, a local copy is made which is then used temporarily . "RegData Life" is the time in days that the user will be able to access using the local copy without having renewed it with a successful internet access.
These are some tests I did with the new version:
1. Using MyPanel I set the user record as disabled. When running the application I got the following:

2. I set the system date back 2 days. When running the application I got the following:

Here I have established a tolerance margin of 25 hours to avoid any problems that may arise with the time zone.
3. Using MyPanel I changed the expiration date to a date before the current one. When running the application I got the following:


HOW TO UPGRADE TO v1.3
We recommend that you follow these steps:
1. First of all, read this documentation.
2. Start testing the new examples
There have been changes to the examples so it is important that you do all the necessary practice with these new examples. Once you have tried it and found it to work satisfactorily, only then proceed to the next step.
3. Implement MyLock v1.3 in your application
Implement this version in your application in the same way that you did to implement the example in the previous step and do all the necessary tests to be sure that everything works correctly. just then proceed to send the new version to your users.
New Online Control Panel
Now from the AV-SOFT site http://av-soft.com in your user account you can access a new control panel where you can view and edit the user and application tables.

By clicking on "Edit Users" you can access a page where you can explore your users and edit their most relevant fields.
New Releae 1.3.1
The need arose to be able to send the expiration warning messages to more recipients, so two additional emails were added in the configuration, also the corresponding fields were added to the database and MyPanel as you can see in the image below:

In the image you will see that checkboxes have been added to be able to select which emails the messages will be sent to.
Some minor bugs related to sending messages were also fixed, so we recommend that you download the new package, recompile your applications and use the new MyPanel.
GET STARTED WITH MYLOCK
Welcome
If you develop applications in Delphi, this product can be extremely useful for you. The MyLock licensing product is a new, powerful and simple way to protect your software. Will help you to market your soft product safely, and allow to your potential buyers to evaluate your products before purchasing them, MyLock may be the solution you were looking for.
General Concepts
The MyLock web server
To work, MyLock needs a web server to store all the information in a MySql database. Initially you do not need to have your own web server since MyLock provides you with one already installed and that you can use without additional cost. This makes the implementation of MyLock very simple.
Your own web server
When you consider it necessary, you can install your own web server and transfer all the information from the MyLock server to yours.
How much does the subscription cost?
Your subscription will be free until you exceed 30 users. Then the cost will vary according to the number of users you have as shown in the following table:

The Parts that make up MyLock
Below we see the main elements that make up the AVLock Express Licensing System and how they are interrelated:

1. The MySQL Database
All data in the subscription system is stored in tables of a MySql database located on a Web Server to which all components of the system directly or indirectly access. There, the user's personal data and their licensing data are stored.
2. The OLM (Online License Manager)
It is composed of several PHP scripts whose function is to communicate Delphi applications with the MySql database.
3. MyPanel
It is a Windows application developed in Delphi that allows you, the developer, to manage all data into the database.
4. Your Application
There are several examples which will guide you to implement MyLock into your application. Through MyLock you can have complete control of your application from the MyPanel utility. On the other hand, the process of registering the user of your application is trivial, they only have to enter from the application their personal data and then receive via email an activation code.
You will have to copy some of the files distributed to the folder where you develop your application and insert a few lines of code. Also for the user of your application the registration process is trivial, they only have to enter from the application their personal data and then receive via email an activation code.
1. Register for free
Let's go to the AV-Soft site from http://av-soft.com. We will see the following:

First of all you must login by clicking on “Login” as seen in the image below:

Then you will enter to the LOGIN screen:

If you do not have an AV-SOFT account yet, you must access the "Create account" option and follow the entire process until you obtain your own account. Then you must enter your email and password. In the example, I am using my own email and password: Once logged, to register MyLock go to the Products page.

From the MyLock product page click on the “Register for free” button.

Then you will receive the following message thanking you for registering.

After clicking on 'OK' select your subscription account:

At the top you can see the account status:
Status: active, Machines: 2, Start: August 18, 2019, Expires: When the number of users reaches 31. Users: 2. Hosted in: AV-SOFT.
Next we have the DOWNLOADS and CONTACT sections. The DOWNLOADS section allows you to download the complete MyLock package with all its content. You can also download it from "Home" and "Products".
The CONTACT section allows you to send us an email when you need to make an inquiry.
As in this example, the subscription is in the free stage, since we only have 2 users, the RENEWALS section does not appear, but when the number of users reaches 31 it will be assigned 30 more days of free use and you can see the RENEWALS section As shown in the image below:

2. Download the package
Download the MyLock package and extract its contents into a folder on your computer, for example in c:\mylock. You can download it from "Start", "Products" or from your subscription account. Below you can see in detail the scheme of folders and the files contained in them:

Note that in the php folder are all the php files that make up the OLM (Online License Manager).
Install the MyLock component
In the Component folder of the MyLock package you can find this compiled component for most of the current Delphi versions. To install, enter your Delphi IDE and go to the option (Component> Install Packages ...) and click on the [Add ...] button as you can see below in the image:

There, select the mylock.bpl file that corresponds to your version of Delphi and click on the [Open] button.

After clicking on the [Open] button you will return to the previous screen where you can see the MyLock package installed:

Protect your application with MyLock
Protecting a Delphi application with the MyLock component is a very simple task. You only need to configure the component by entering the app_code copied from MyPanel, the name of the Application, the version and check if you want to verify the date of the PC every time you start the application.

Then, you must enter some lines of code and you will have your application protected. We are not going to go deeper into the topic at this time since in the next section we will see it in greater detail.
Starting with MyPanel
MyPanel is the MyLock development panel from where, first of all, you must define your applications and then also manage your users' accounts. It is convenient that you make a shortcut to the mypanel.exe file to be able to access it more comfortably.
When you run MyPanel for the first time you will be asked to enter your email and password. Enter the same ones that you use to log in to the AV-SOFT site. See the image below:

Then you will go to the main screen of the MyPanel as you can see below in the image:

All functionality is included in two areas: the Toolbar and the Tabsheets, which we will see in detail below:
The Toolbar

1. Select server. Allow to select the server to be used; that of AV-Soft or your own:

If you select “Hosted on the AV-SOFT server” you do not need to enter any data since internally MyPanel already has this information, but if you select “Hosted on your own server” you must enter the data of your own server as seen below in the image:

2. Backup the Database. It allows you to make a backup copy of all your data in the database. Clicking on the corresponding button will generate the backup and the file Explorer will open so you can select the place where you want to save it.
The backup generated also serves to transfer the information to another server. For example, if you are using the AV-SOFT server, you can make a backup copy to transfer all the information to your own server. You can do it with the Import function of the PhpMyAdmin from the cPanel. See the image below:

3. Registration. Allows you to see the status of the record. See the image below:

4. Information. It shows information about the server used, the current number of users and the price range based on the number of users, as you can see in the image below:

The Tabsheet

This area is where the main features of MyPanel are found, namely:
- Applications
- Users
- Unregistered machines
1. Applications
Below you can see MyPanel with the Applications tab open where we have already created an application:

At the top we see the buttons to add, modify and delete applications and at the bottom we see the data defined for the application in three different tabs “Basic data”, “Renewals” and “Messages”. Later we will see how to create an application and all the parameters that we can define so that it has the behavior we need.
2. Users
Below you can see MyPanel with the Users tab open, where we can see that 241 users have already been created on 13 pages of 20 users each:

In the top bar we see the buttons to add, modify and delete users, the number of records and utilities to go to a given record, sort by a given field, filter by application, search by a given text and refresh the data.
In the central area we have three sections: on the left the pages, then the list of users corresponding to the selected page and on the right the machines registered for the selected user.
In the lower area we see the data of the selected user.
3. Unregistered machines
Below you can see MyPanel with the “Unregistered machines” tab open, where we can see only one PC listed:

Listed here are the machines on which the user installed the application, but not yet associated with their user account.
Define the application in MyPanel
The goal of MyLock is to protect your application so that it cannot be used in an unauthorized manner. To achieve this, you must first define the application in MyPanel and then apply the MyLock component to your application and configure it so that it can be controlled based on the definitions made in MyPanel. Next we will see these two stages:
Let's look again at the main screen of the Applications in MyPanel.
Let's click on the "Add new application" icon. We will be shown the following screen where we will have to define our application:

Here we can see first the APP-CODE and below three tabs where we will define the different parameters that will allow us to control the application.
The APP-CODE
At the top we see the app-code that is initially blank since it depends on the ID of the record that was not yet created. This code will be generated when the record is saved. Then we will see how this code allows you to link the application with the parameters that we set when defining the application in MyPanel.
The MAIN DATA tab
Changes made in version 1.3
The concept of instance is added:
It refers to an application execution instance, always associated with a Mac-Code that identifies a PC, which in turn is associated with a User.
In version 1.0 of MyLock we had the Machines field that established the number of computers that could be running the application at the same time. This works great for common users, but the problem arises with corporate users who typically install the application on a server and run it over the network from multiple client computers. In this way, the mac-code (unique code of each computer) that identifies each computer is the same for all clients since it is obtained from the server and not from each of the client machines. For this reason, in version 1.3 we no longer count the number of machines that are running, but the number of instances running.
If you are currently upgrading from a previous version see the image below for the changes made

First you must enter the name and version of the application. We also have the option to deactivate the application with the “App is disabled” checkbox:

Then we have the Instances Life field that allows defining the number of hours of validity of each instance.
This field was added due to a problem that exists to maintain a correct value for the number of PCs that are running (instances). This value increases by one each time an application instance is started and decreases each time the user closes the application. But it is impossible to ensure that the application always closes correctly as the PC may suddenly shut down due to lack of power, or the user may turn off the PC without closing the program, or kill the process, etc. In all these cases in MyPanel we would see that the number of instances running is greater than the real one. The solution I have found to this problem is to establish a life limit for the instances, in this way, before starting an instance again, all the user's instances are analyzed and they are removed from the registry when they have already exceeded their lifetime settled down.

Then we have the Max Instances field that allows you to define the maximum number of instances. Here it is defined as a default value that will be used to set the maxinstances field of the user record when it is created. Later this value can be modified in each user that requires it.
If the Verify system date is checked, then, when the application starts, it will be verified if the date of the computer is correct.
Next, we have the RegData life field. Normally, each time the application starts, it accesses the OLM to verify the registration status, but if at the time of starting the application it cannot access the OLM because it does not have internet, the registration status is taken from a local copy , but once the established days have elapsed without being able to access the OLM, the application will require an Internet connection to access the OLM and verify the registration status.
Next we have the sender data. Here you must enter the name and email that will appear as the sender of the messages sent to your users.

Finally we have the definition of trial periods, which consists of two stages in the life of the application in which the user can use it for free.
-Before activation and After activation: when the user starts the application, the first trial period begins. We do not have user data yet, but knowing that some users are reluctant to disclose their personal data, it is convenient to allow the user access to the application for a few days to evaluate it and see the convenience of continuing to use it. During this period, each time the user starts the application, they will be informed that the application is in a pending state of registration and will be suggested to enter their personal data. It is also possible to set the days of this period to zero. In this case, the user will not be able to use the application until he has entered his personal data.
So we have to define the duration of the "Trial days", the license data "License data" and the number of computers that can be activated with the same account. For the first stage before activation, only one computer is possible since there is no user account yet, but after entering personal data and having the user an account, it is already possible to allow the user to activate more than one computer.
Finally we have the definition of the trial periods, which consists of two stages in the life of the application in which the user can use it for free.

The most common use of the “License Data” field is to define the modules that will be active. You could have several modules with different functionalities in your application, and in turn each module could have different levels. For example, if we had four modules and we want that during the first trial period only modules 1 and 3 with level 1 are active we would put License Data = '1010', and if for the second trial period you want all four modules are active in level 2 we would do License Data = '2222'. This field can also be left blank if there is no need to configure modules.
Next we see screenshots of the steps that the user must perform to activate the application.
The first time the application is launched, it is in the Pending Activation state and will remain in this state until the user enters their personal data by clicking on “Request your activation code” and receiving the activation code via email, which must be enter and click on the [Activate] button.
During this first stage, with the [Close] button the user can close this window and move on to the application.

This is the screen that appears when you click on “Request your Activation Code”.

After clicking on the [Request your Activation Code] button, you are informed that you have been sent an email with the activation code and you will go back to the previous screen where you will have to enter the received code.

This is the screen that appears when you click on “Request your Activation Code”.
Dear Alcides Valega. Well done! Thank you for requesting the Activation code. To be a registered user you only need to enter the following code on your PC and click on the [Activate] button.
3F5FDA80-EE654B59-94F2CB82-0DC51E1A
By copying and pasting you will avoid typing errors. You can also use this same code to activate other PCs.
Once the activation is done, the registration status window will no longer be presented when the application is started. Likewise, it is convenient to place a button in your application to access it.
Now the status window will show the following:

Later when we see the examples we will delve into this topic.
The MESSAGES tab
This is the screen where you must define the messages that users will receive automatically in the different situations that arise during the life of the application. To facilitate the task, default messages are included that you can modify or translate to meet your needs.

We have the following sections where the messages associated to the following situations are grouped: Welcome message, For activation, Before expiring, After Expiring, Signature and Options. These sections are accessed through a left side menu.
With the last entry "Options" we have the following:

Here we define the days before and after expiration on which the messages will be sent and the number of messages that will be sent. In this case we define 10 days before and after and that the messages are sent 2 times. In this case, the messages will be sent on days 10 and 5 before and after expiration
The RENEWALS tab
MyLock allows the user to make payments to you directly from the application through PayPal. We call this tab “Renewals” because we consider that the most frequent use of MyLock will be to manage subscriptions that require periodic payments, although it also allows you to configure a subscription for life with a single payment. Below you can see a screenshot of the RENEWALS tab:

Disable Renewals
At the top we have the checkbox "Disable Renewals". You can check this box if you do not need this functionality. This way, the “Renewals” tab will not be visible in the application registration window.
Renewals editing area
Below you can see this area where you can add, modify and delete renewals records:

Two records are already defined for semiannual and annual renewals. You can modify, delete and/or add new ones.
-To add a new record, enter the data in the editing area and click on the “Add” button.
-To modify a record, select it at the top and then make the modifications in the editing area and finally click on the “Replace” button.
-To delete a record, select it at the top and then click on the “Remove” button.
Options in the editing area
Here we define the following properties;
-Description and price.
-Duration of the license period: it can be permanent or temporary.
-Add instances: refers to the number of instances of the application that the user is authorized to run simultaneously. The entered value will be added to the existing one.
-Change the license data: The new value will replace the existing one.
PayPal configuration area
Here you set the configuration so that PayPal works on your “Sandbox” test platform or on your real “Live” platform, for which you must enter the following information. Below you can see a screenshot of the PayPal configuration area

In order to use the PayPal sandbox you must first create two dummy accounts in https://developer.paypal.com/developer/accounts/
An email account for the seller and one for the buyer. Suppose you have created the following dummy accounts:
Seller account: your-biz@yourdomain.com pass: xxxxx
Buyer account: your-per@yourdomain.com pass: yyyyy
Also, suppose your real PayPal seller account is yourname@yourdomain.com
Then you must enter the dummy seller account for SANDBOX EMAIL and for LIVE EMAIL: your real seller account on PayPal.
You must check the “Use PayPal Sandbox” checkbox to do the tests with your application and verify that the payments made from the RENEWALS section of the application are made correctly, here you must use the email of the fictitious buyer account. We will see it in more detail, later, with the example applications.
Different urls are used for the sandbox and the actual PayPal. They are the following: For the sandbox: https://www.sandbox.paypal.com/cgi-bin/webscr
For real PayPal: https://www.paypal.com/cgi-bin/webscr
Check the “Receive payment emails” checkbox if you wish to receive payment messages made in your email account entered in SENDER DATA. To make the tests with the sandbox it is convenient that you mark it in order to verify that the message that the buyer receives is correct. You can also leave it checked when using Live mode but in this case it would not be so necessary.
Area to configure the message that the buyer will receive
After making the payment, the buyer will receive a message with the purchase detail. This message will be based on the following parts: SUBJECT, BODY1, BODY2 and BODY3 also, as the operation can be in Completed or Pending status, BODY2 has 2 sections for each of these situations. You can modify these messages to suit your needs. See the screenshot below:


Implement MyLock into your application
In this section we present three application examples protected with MyLock. You will see that the implementation is very simple in all cases. We advise you to read all three examples and once you are aware of all the possibilities you have, just then decide how to implement MyLock in your application.
Example1
Define the application in the Delphi IDE
The application that we are going to see is in the product package as Example 1. From the Delphi IDE we create a new application. We place a MyLock component and a button with the “View Registration Form” caption. The registration form is automatically displayed when it is necessary for the user to activate the application but once activated in order to access this form we place this button.
Then we must link the MyLock component with the application defined in MyPanel. We only have to place the following three properties: App-Code, App-Name and App-Version as shown in the screenshot below:
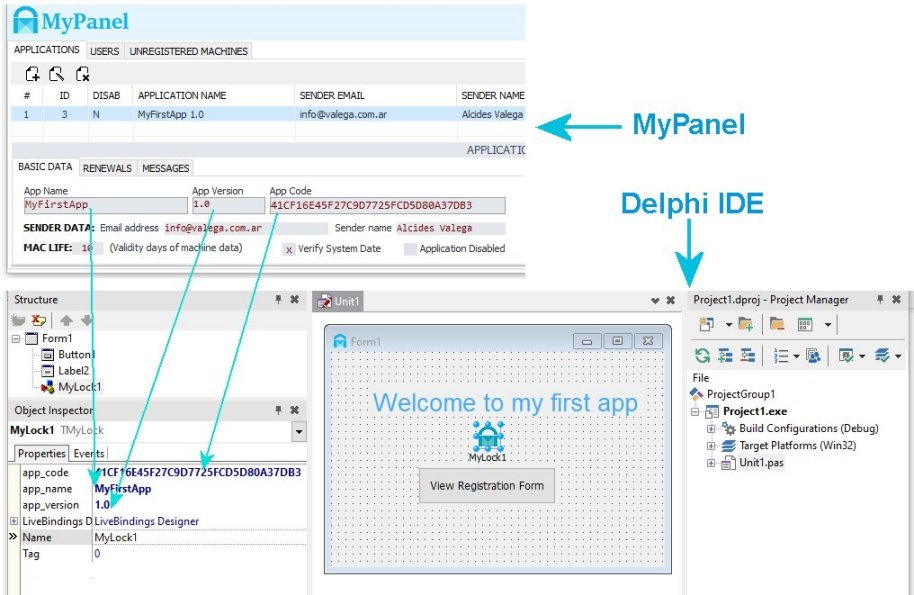
Note that the "check_date" checkbox has been removed here. This is because now this property is managed from MyPanel.

The code in this first example is as follows:

How can we see, it is extremely simple. The only thing we add is the following:
In the OnCreate event: MyLock1.execute (false);
In the Click event of the button: MyLock1.execute (true);
In the OnClose event: MyLock1.detachMachine;
The MyLock1.Execute function accesses the OLM on the Web server and verifies the registration status and if it is not correct the registration form is displayed so that the user can activate the application or renew the license by making a payment through PayPal The parameter (false) in the OnCreate event means that if the application does not need activation, this form is not displayed. But, in case we want to force access to the form even if it is not essential, we call Execute with the parameter (true), as in the “View Registration Form” button.
If, upon closing the registration form, the status is expired or an error occurs, a message is displayed and the application is forced to close.
The DetachMachine procedure that is called when the application is closed modifies the RUNNING, INSTANCES, ENDRUN, and COUNT fields of the machine table. From the array in the INSTANCES field, the timestamp corresponding to the instance that has been closed is removed, and the value of RUNNING is decreased by 1, and ENDRUN saves the date on which the execution stopped and 1 is added to COUNT that indicates how many times the application has been run on that PC. This allows you to see from MyPanel which PCs are running, when it was last shut down, and the hours it was run.
Define the application in MyPanel
In this first example we will configure the application in a very simple way. Later we will see other more advanced configurations:

Note the following:
1 We set before activation (Trial days = 0). This will mean that the first trial period does not exist and the user is forced to activate the application to be able to use it during the 30 days established for the second trial period.
2 Leave the License Data fields blank as we will not use them in this example.
Run the application
The first time the application starts, it is in the pending Activation state and will remain in this state until the user enters their personal data by clicking on "Request your Activation Code" and once the activation code has been received by email , use it to perform the activation.
What happens in the OLM with the first execution
When you run the application for the first time, a record is generated in the database in the machines table for the PC that is running the application. Here begins the first trial period "BEFORE THE ACTIVATION". The application is configured with the values defined for the application in MyPanel that we can see in the image below:

Because we define here (Trial days = 0) the user will not be able to use the application during this first trial period and must necessarily activate the application in order to use it.
The record created in the machines table can be seen in MyPanel in the UNREGISTERED MACHINES tab

Request your activation code
Let's go back to the application. There we have to place a code to activate it, but to get it we have to click on “Request your Activation Code”.
After clicking on Request your Activation Code the following form is presented. Here, the user must enter their personal data.
After filling in the data and clicking on the Request your Activation Code button, you are informed that you have been sent an email with the activation code and you will go back to the previous screen where you must enter the received code
Then the user will receive an email like the following:
Dear Alcides Valega. Well done! Thank you for requesting the Activation code. To be a registered user you only need to enter the following code on your PC and click on the [Activate] button.
3E5084AF-A3A07A0F-A70DEA93-BC66AE35
By copying and pasting you will avoid typing errors. You can also use this same code to activate other PCs.
The user must keep this code, since it is unique for all their PCs. Therefore, when need to activate another PC, will not be longer necessary to request this code and the user can continue directly with the next step.
Activate the application
We activate the application by entering the received code:

Once the activation is done, the registration form will no longer be presented when the application starts, but we have the “View Registration Form” button that allows us to access it. Now the status window will show the following:

The User Record in MyPanel
When requesting the activation code, a new user record was generated in the database that can be seen in MyPanel:

With MyPanel you can modify user data, so you can change the expiration date, status, max-instances or license data. In this way, you can grant the user a certain time of use, establish the number of PCs that can be used at the same time and / or make other more precise adjustments through the License Data. Being thus able to adjust the application to the specific needs of the user.
Below you can see the possible options for STATUS. If you select “Fully Active”, the EXPIRE DATE will not take effect and the status will not change even if the expiration date is exceeded.

But as we had already seen in the definition of the application in MyPanel, there are Renewals that are default configurations that can be applied through PayPal payments. These settings will now be seen in the application in the "Renewals" tab of the registration form.
Renewals in the application
As we see now in the registration form the Activation tab disappeared and we have a new tab, Renewals, where the user can make the payments of the renewals or as in this case a single payment for a permanent activation of the application as we had defined in MyPanel:
The definition in MyPanel:

How it looks in the application:

Make payment from the application:
Clicking on “Pay Now with PayPal” presents the PayPal login form (Del Sandbox in this case). We must use the fictitious buyer account email that we have defined in
https://developer.paypal.com/developer/accounts/

By clicking on "Log in" we go to the following form:

After clicking on “Pay Now” we will see a chart with a summary of the operation performed:

Payment confirmation email:
Once the payment is completed, the user will receive the following email:

As I am doing the tests with the PayPal Sandbox, the confirmation message is sent to a non-existent dummy email, so to receive this message I had to mark “Receive payment emails” in the PayPal settings as can be seen below:

See the changes in the application after payment
Now let's close and open the example again to see the changes made through the payment made. So let's click on the “View Registration Form” button:

We enter the registration form where we see that now the status is FULL ACTIVE, NEVER EXPIRES, so the payment made the expected effect, now the application is permanently active.

The user data in MyPanel after payment:
If we now enter MyPanel we can see the changes made in the user data.

Example2
Define the application in the Delphi IDE
Here is a screenshot of the main form of the example in the Delphi IDE:

We can note that we do not place a MyLock component here. In this opportunity we will choose to define it in the code.
The interface section of the code is as follows:

Note that we have added mylock to the uses clause and declare the MyLock variable that we will then instantiate in the initialization section.
The rest of the code is as follows:

Note that in the initialization section, the MyLock1 instance is created and the app_code, app_name, app_version and check_date configuration values are assigned. We saw in the previous example how this was done in the component.
Then in the finalization section we destroy the MyLock1 instance.
The MyLock1.execute function
We had already used this function in the previous example, but now we are going to see what it does internally. First, you get the current registration status, which can be one of the following:
0 = NOT REGISTERED,
1 = PENDING,
2 = ACTIVE,
3 = FULL ACTIVE,
4 = EXPIRED,
5 = DEACTIVATED,
6 = ERROR
Then, if the status is not between the values 2 and 3, or if the passed argument is true, the registration form is displayed where the user can take any action that changes the status of the application, such as: activate the application if is in pending status or make a payment for a renewal that changes the status to active or always active.
Upon exiting the form, the status is calculated again and if it is not between values 2 and 3 the application closes displaying a message.
The BtnReg button is equivalent to the “View Registration Form” button in the previous example and allows you to view the registration form.
Code for the OnCreate event
At the beginning we have two commented lines of code that show how to change the language of the different messages and texts that are displayed with the MyLock component. Two language files are included in the package; english.ini and spanish.ini for English and Spanish respectively. You can modify these files, change the text of the messages and/or translate them into any other language.
Then we have the MyLock1.Execute (false) line that we saw in the previous example.
The MyLock1.DetachMachine procedure
The DetachMachine procedure that is called when the application is closed modifies the RUNNING, INSTANCES, ENDRUN, and COUNT fields of the machine table. From the array in the INSTANCES field, the timestamp corresponding to the instance that has been closed is removed, and the value of RUNNING is decreased by 1, and ENDRUN saves the date on which the execution stopped and 1 is added to COUNT that indicates how many times the application has been run on that PC. This allows you to see from MyPanel which PCs are running, when it was last shut down, and the hours it was run.
The setModules procedure
In the example we have four buttons to access each of the four modules, namely:
btnMod1 to access the “General Ledger” module
btnMod2 to access the “Account Receivable” module
btnMod3 to access the “Account Payable” module
btnMod4 to access the “Stock / Inventory” module
Our goal is to use MyLock to enable/disable each of these modules and also set levels for each of them. We will implement it through the LicenseData field using the first four characters of it, where each character will be a numerical digit from 0 to 9, so if it is 0 the corresponding module will be disabled and if it is greater than zero, its level will be between 1 and 9. To facilitate implementation we include the MyLock1.getModule function that takes the License Data field and extracts the digit with the position corresponding to the given parameter.
Below we see the setModules code

We can see that here we have the integer variables m1. M2, m3 and m4 that take their values from calls made to getModule.
In this way, if we have (LicenseData = ‘1053’ we will obtain m1 = 1, m2 = 0, m3 = 5, m4 = 3.
There are many other ways to use the LicenseData field. For example, I have an accounting program that has the following 3 modules; Main, Purchases and Sales and I have case studies where the LicenseData takes values such as the following:
LicenseData = ’111.550.1400.25.’. They are numerical values separated by points. They are interpreted as follows:
111: To enable each of the three modules.
550: Maximum number of Accounts allowed
1400: Maximum number of Seats allowed
25: Maximum number of companies allowed.
The LicenseData field can be accessed from the application with MyLock1.reg_licdata. Its value must be assigned to a string variable.
The definition of the application in MyPanel

Run the application
When executing the application we see the registration form in the Pending Activation state, as in the previous example, but with a difference in the time that the application can be used in the pending state.
By clicking on the “Status” tab we see that we now have a period of 10 days to test the application.

And by clicking on the "Close" button you can now access the main form of the application.

As we can see, the modules are configured with the value that we have set in the LicenseData field of the application definition for the first test period BEFORE ACTIVATION: "1110". When the application was run for the first time, a record was created in the machine table and this value "1110" was copied into the LICDATA field of this record.
This record in the machine table is responsible for controlling the application during the period with PENDING status. When the user enters their data and requests the activation code, the record for that user will be created in the user table and the ID of the record in the machine table will be copied to the IDUSER field of the record in the user table, so, the record of the machine table will be linked to the record of the user table. Note in the image above that the USER ID field is blank, but after activation it will take the value of the user ID.
The definition of the application in MyPanel
Let's go back to the application. We are still in a PENDING STATUS state, therefore we request the activation code as we had done in the previous example and activate the application with the code received via email.
Dear Alcides Valega. Well done! Thank you for requesting the Activation code. To be a registered user you only need to enter the following code on your PC and click on the [Activate] button.
3F6EA497-8184881C-21AC80B4-1AF49255
By copying and pasting you will avoid typing errors. You can also use this same code to activate other PCs.
Then we enter the activation code and click on the "Activate" button:

Let's see what happened with the activation
First let's look at the main screen of the application:

We noticed that now all the modules are Active and at level 1, as we had established when defining the application for the second trial stage with (Trial days = 30) and LicenseData = ‘1111’.

Let's see what happened on the registration form, We access this through the “R” icon:

We can see that the application is now ACTIVE and the remaining 7 days of the previous trial period have been added the 30 days defined in the application with a total of 37 days remaining.
Let's see what happened with the records in the database. Let's go to MyPanel. We can see that the registration of the machines table is no longer in the “UNREGISTERED MACHINES” tab

We can see that now the machine table registry has been linked to the newly created user registry with activation. Note that now the USER ID of this record has the value of 4 that matches the ID of the user record. See the image below:

Custom Renewals
Below we can see the user data editing form in MyPanel:

We had already seen this form in example 1, but what we want to note now is the optional configuration area on the right. If we click on “CUSTOMIZED RENEWAL JUST FOR THIS USER” this form is enabled as we can see below:

This option is useful when we want to make a customized update for a special user, so when the user enters the registration form, in the “Renewals” tab, will see the following:

After the user makes the payment through PayPal, your application will be adjusted according to the parameters established in this personalized renewal.
Below we see that the payment was successful:

And we have received the email with the message addressed to the user:

Restarting the application we see how the state has changed. Note that now the subscription has been extended with the 720 days we had defined until 02/16/2022.

In MyPanel we can also see how the user account data has changed. Now we have Max Instances = 2, LicenseData = ’2222’ and ExpireDate = 16/02/2022.

Example3
Example 3 is functionally identical to 2, but the big difference is that it includes a certain source code that is normally only found in the component. This is the Execute function and the registration form. The biggest advantage that this version allows is the possibility of modifying the registration form adapting it to the design style of the application and changing texts, fonts, etc.
The application in the Delphi IDE
Here we have chosen to place a MyLock component in the form, although it can also be instantiated from code as we saw in example 2.

The code of the main form is identical to example 2, with the only difference that instead of calling the Execute function from the MyLock1 component, we do it from the Execute function included here.
Into the interface section:
Note the declaration of the Execute function.

Into the implementation section:
Note that we added an uses clause to invoke the registration form “reg” that we will then invoke from the Execute function below:

Code for the Execute function:

Prepare your own server
We will see below the necessary steps to prepare your own server from a hosting account with CPanel:
Create the new database
In the Databases section of the CPanel you must click on the “MySQL Database Wizard” button:

The first step
The first step of the wizard is as follows:

There you must enter the name you want to give the new database. In my test I placed "mylock". Note that the user name of the CPanel is automatically preceded, in this case “ac”. By clicking on “Next Step” you access the second step:
The second step
In the second step you are asked to create a user for the database you are creating:

Note that I have used for the username the same name I used for the database. This way it is easier to remember. In summary we have:
Database: ac_mylock
User: ac_mylock
Clicking on the “Create User” button you access the third step.
The third step
In this step, the new user created is associated with the database created in the previous step. Normally, all privileges must be granted to the user by clicking on the “ALL PRIVILEGIES” check box.

The fourth step
Finally, by clicking on “Next Step” we access the fourth step where we are informed that the operation has been successful:

Here we can return to the main screen of the CPanel by clicking on “Return Home”.
Now that you have your database created, you are able to transfer the data from the AV-SOFT server to your own.
Backup from the AV-SOFT database.
The first thing to do is to backup the database, but before doing so you must verify that your MyPanel is linked to the AV-SOFT server. It should look like in the image below:
Then you must click on the button shown below:

Clicking on this button will generate the backup and the file browser will open so you can select the place where you want to save it. In my practice I used the following filename:
backup_2020-02-06.sql
Import the backup file from the CPanel
In the CPanel we access phpMyAdmin

Already within PhpMyAdmin (image below) we can see on the left the database “ac_mysql” that we just created. We select it and then access the "Import" option, click on the "Bowse ..." button that opens the file browser from where we select the backup file backup_2020-02-06.sql that we had generated.

Finally we click on the "Go" button that causes the import of the data from the backup file to the new database. At the end of the process a detail of the operation carried out is presented with the following message:

If we check the database we can see the 4 tables created; applications, customers, machines and users. Each of the records in these tables were created with the same ID they had in the AV-SOFT database.

Prepare the conf.php file
In the product package in the php folder are the scripts that you must upload to a folder on your server, but before doing so you must modify the conf.php file by putting your own data. Below you can see the one I used to do the tests. In most cases it is not necessary to change the line ($ sql_host = "localhost").

Note that in the php folder are all the php files that make up the OLM (Online License Manager)
Copy the php files to your server
To copy the php files to your server you can use the CPanel or an FTP client. I used the second option in my practice using WinSCP. Below you can see a screenshot of it:

You must first create the folder on the server, in this case in the right pane, the public_html/mylock folder. Then, in the left panel you must select the php files to copy and click on “Upload”.
As the domain assigned to public_html in my tests is "avasconta.com.ar", in the configurations I use below:
Web Host : ‘www.avasconta.com.ar’
Olm Path: ‘/mylock’
Adapt the application to the new server
It is important to note that when using your own server you should only make a few small changes in the application and recompile and distribute it to your users. In addition, the activation code will be the same as before, so users will not need to reactivate the application.
Example 1
The only change necessary for Example 1 to work on your own Web server must be made in the OnCreate event. When we used the AV-SOFT server we had only one line calling the Execute function;

Now to work on your server you must add three lines; the first two allow you to link the application to your server and the last one defines the HTTP / HTTPS connection mode. For the first line instead of ‘www.avasconta.com.ar’ you must place your own domain and on the second line for Olm_Path, the name of the folder where you copied the php files. In the third line you must indicate the connection mode, where 0 = HTTPS and 1 = HTTP.

Example 2
For the example 2 the modification must be made in the initialization section. How it looks in the image below:

Example 3
And in example 3, as in example 1, the lines must be added to the OnCreate Event:
I tried to make this help as clear and complete as possible, however, there may be some problems not covered by this documentation. If you think I missed something, or found errors, or have any ideas that might be useful to improve this help, let me know.
Alcides Valega
The author
Alcides@valega.com.ar