AVLOCK EXPRESS - USER GUIDE
Videos
 1 - Introduction
2 - Get Started with AVLock Express
3 - The Dev-Panel and First App
4 - Trial Machines
5 - Main Features and Extra Features
6 - Modules and Translation
7 - Activation Part 1
8 - Activation Part 2
9 - The Chat System
10 - Automatic Notifications
11 - Renewals with PayPal
12 - Example 2 Alternative
1 - Introduction
2 - Get Started with AVLock Express
3 - The Dev-Panel and First App
4 - Trial Machines
5 - Main Features and Extra Features
6 - Modules and Translation
7 - Activation Part 1
8 - Activation Part 2
9 - The Chat System
10 - Automatic Notifications
11 - Renewals with PayPal
12 - Example 2 Alternative GET STARTED WITH AVLOCK EXPRESS
Introduction
If you develop applications in Delphi, this product can be extremely useful for you.
The AVLock Express licensing product is a new, powerful and simple way to protect your software. It is much simpler to implement than previous versions of AVLock.
If you are a Delphi programmer and NEED to market your soft product safely, and you want your potential buyers to evaluate your products before purchasing them, AVLock Express may be the solution you were looking for.
Like AVLock SS, it is a subscription system where every user of your application has an account in the database of your website. This account contains the user's personal data and also the licensing data as the start and end date of the licensing period and other data that allows controlling the application settings, such as active modules, machines available, support, etc.
The Parts that make up AVLock Express
Below we see the main elements that make up the AVLock Express Licensing System and how they are interrelated:
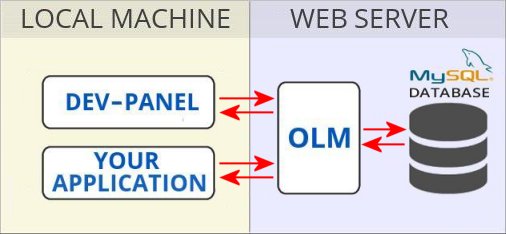
1. The MySQL Database
All data in the subscription system is stored in tables of a MySql database located on a Web Server to which all components of the system directly or indirectly access. There, the user's personal data and their licensing data are stored.
2. The OLM
It is made up of several PHP scripts whose function is to communicate the Delphi applications with the MySql database.
3. The Dev-Panel
It is a Windows application developed in Delphi that allows the developer to manage the system data.
4. The Application
This is your application that must be linked to your server and thus to be controlled from the Dev-Panel. To implement it, you should follow the examples included in the package.
You will have to copy some of the files distributed to the folder where you develop your application and insert a few lines of code. Also for the user of your application the registration process is trivial, they only have to enter from the application their personal data and then receive via email an activation code.
Conventions
In the course of this tutorial you will enter different types of data such as names and passwords and is very easy to get confused about the data to be entered on each place. These conventions will help you avoid mistakes:
|
CONVENTION |
MEANING |
|
<avsoft-user-email> |
The email address used as user of the AV-SOFT site |
|
<avsoft-user-pass> |
The password used as user of the AV-SOFT site |
|
<host-user> |
The user name of the hosting account |
|
<host-pass> |
The password for the user of the hosting account |
|
<your-domain> |
The domain attached to your hosting account. Domains examples are: google.com, yahoo.com, etc. The AV-SOFT domains are: av-soft.com and av-soft.com.ar |
|
<sql-host> |
Host for the MySql server. Normally localhost |
|
<sql-user> |
User name for the MySql database |
|
<sql-pass> |
Password for the user of the MySql database |
|
<sql-db> |
MySql database name |
|
<prefix> |
A prefix to be prepended to the table names |
|
<enckey> |
Encryption key used to encrypt data that is transferred between the web site and a Delphi application. |
|
<olm-path> |
Is the path to the OLM folder, relative to the folder where <your-domain> is pointing. e.g. "/xlock". |
|
<sender-name> |
The name of the sender |
|
<sender-email> |
The email address from which the emails are sent |
In the development of the documentation we include explanatory references mentioning the conventions to identify the data entered. As shown in the image below:
Register it for free
Free registration in the AV-SOFT Site
Installing AVLock Express
After you have registered your free 90-day subscription and downloaded the package, you will be able to make the necessary installations to use AVLock Express as your software licensing system.
The AVLock Express Package
The AVLock Express package comes as a zip file. Its contents are as follows:

Each of the package folders corresponds to one of the main elements that make up the AVLock Express Licensing System. Below in the image you can see a diagram that shows how they relate to each other:
Steps required to install AVLock Express
1. You will need a hosting account, preferably based on Linux with cPanel, PHP v5.3 or higher, with the MySqli and MCript extensions installed for the server.
2. A MySql database on your server. You can create a new database or use an existing one.
3. Copy the contents of the olm folder to your server.
4. Install the OLM
5. The tables of the Database
1. A hosting Account
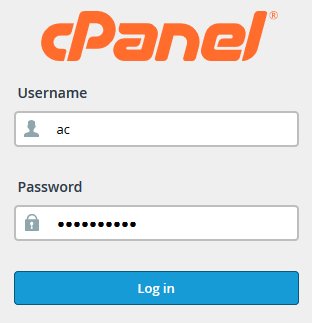
You will need a hosting account, preferably Linux based with CPanel. CPanel is accessed from a web browser with the following URL: http://your-domain: 2082 or http://your-domain/cpanel. Here "your-domain" must be replaced by the domain that is assigned to your hosting account.
A FTP client such as Win SCP can also be useful.
2. A MySQL Database
If you already have a MySql database, you only need to remember the name of the database, the username and password.
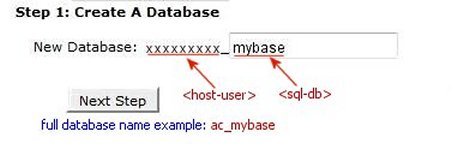
To create a new database, in the cPanel go to the Databases section and select "MySQL Database Wizard".

Step 1: Once inside the Wizard enter the name for the new database. In the sample image below, the name "mybase" was entered for the new database:
Click "Next Step" to proceed to step 2.
Step 2: Clicking on "Next Step" displays the form where you need to create the new user associated with the database. You must enter a name and password for the new user. It is good practice to make the user's name match the name of the database, so in the example we enter "mybase" as the user's name.

Click "Create User" to proceed to step 3.
Step 3: Here select "ALL PRIVILEGES" as shown in the image below:

Click "Next Step" to proceed to step 4.
Step 3: This is the final step. Here you can see the name of the database and the name of the associated user:

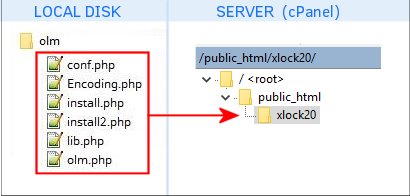
3. Upload OLM php scripts to your server
You should copy the php script files that are located in the olm folder to your server. Create a new folder under the public_html folder and then copy all the files in the olm folder. For this example I created the xlock folder. See the following image:
4. Install the OLM (Online License Manager)
Once the olm files have been copied, it is ready to install. From the browser enter the URL that points to the file install.php recently copied to your server. For example: http://mydomain.com/xlock/install.php
To do so will be presented the AVLOCK EXPRESS INSTALLER installation form, as shown in the image below:

Here you must enter your configuration data, as you can see below:
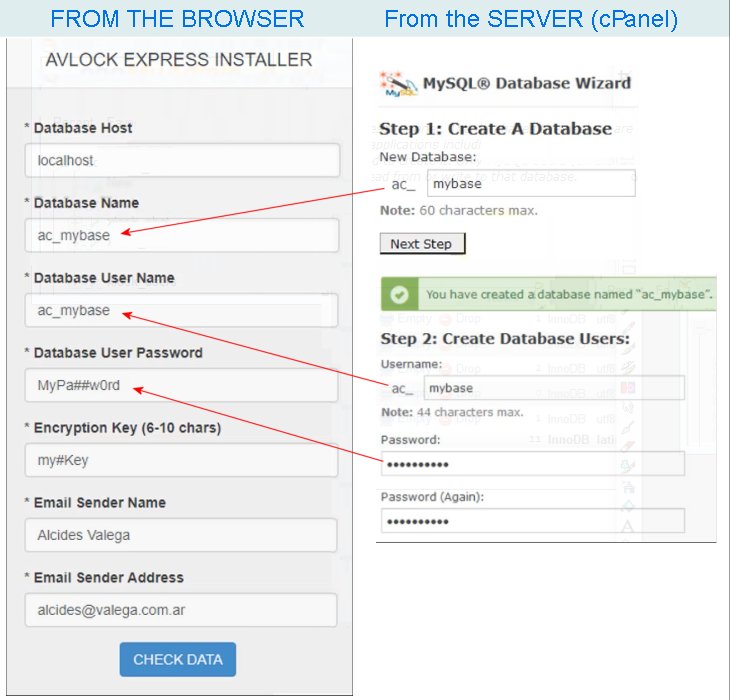
In Database Host it is normal to use localhost.
In Database Name, Database User Name and Database Password, you must use the values that you used when creating the database.
In Encryption Key you must place a key with a length between 6 and 10 characters (my#Key in the example), which will be used to encrypt the data transferred between the Delphi applications on the local machine and the OLM on the server. There are two Delphi applications where you should use this same value, namely: (1) your application (based on the included example and (2) the Dev-Panel.
In Email Sender Name you must place the name that will appear as sender in the messages sent from the Dev-Panel.
In Email Sender Address you must enter the email address that will appear as the sender's email in the messages sent from the Dev-Panel.
Finally, click the [CHECK DATA] button and, if the data is correct, the [SUBMIT] button will be displayed, where you must click to end the installation process. If the operation was successful, you will receive the following message:
Congratulations! Installation completed successfully. As a security measure you must remove the install.php file.
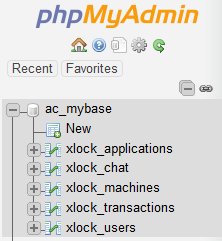
Take a look at the cPanel phpMyAdmin to see the database and tables created:
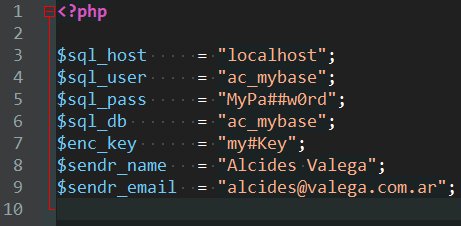
Check your conf.php file on your server. This will now contain the data you just entered in the installation form, as shown below:
5. The tables of the database
The installation process also creates the necessary database tables. In the script lib.php are the functions with the definitions of these tables, which the installer uses to create them on your server in the previously created database.
The app_qry function is used to create the xlock_applications table, which hold the applications definitions, that contain the data of the applications.
The usr_qry function is used to create the xlock_users table, that contain the data of the users.
The mac_qry function is used to create the xlock_machines table, that contain the data of the machines.
The cha_qry function is used to create the xlock_chat table, that contain the data of the chats.
The txn_qry function is used to create the xlock_transactions table, that contain the data of the PayPal transactions.
The Dev-Panel
Install and configure the Dev-Panel
The Dev-Panel utility is an AVLock Express administration tool, which allows you to view, create and modify applications, manage user accounts and track how they use your application.
In the dev-panel folder on your local disk, you must have the xlock.exe file.
Make a shortcut on your desktop by pointing to this file or simply double-click on it to run the Dev-Panel. The first time you run it you will be shown a registration form where you will need to enter your email and password, as shown below:

The email and password used must be the same as the one used when registering on the AV-SOFT site.
Once this is done, you will be taken to the main Dev-Panel screen. Click on the configuration button to enter the data to access to the OLM on your server.
The data to enter are the following. See the image below:
This image shows the configuration that I have used in my test site, feel free to use it also for your practice

The Web Host: Enter here the domain associated with your server, in the format www.yourdomain.com. Usually the domain is associated with the public_html folder and we are going to assume that this is the case.
The Olm-Path: Enter the folder where the OLM is located in relation to the folder where your domain is pointing.
The Encryption Key: Enter the encryption key you entered when installed the OLM.
The APPLICATIONS Tab
Here you define your applications. There are many functions that you must configure from this tab. See it below with the open edition form where we can see three tabs, namely: MAIN DATA, RENEWALS and TRIAL MESSAGES
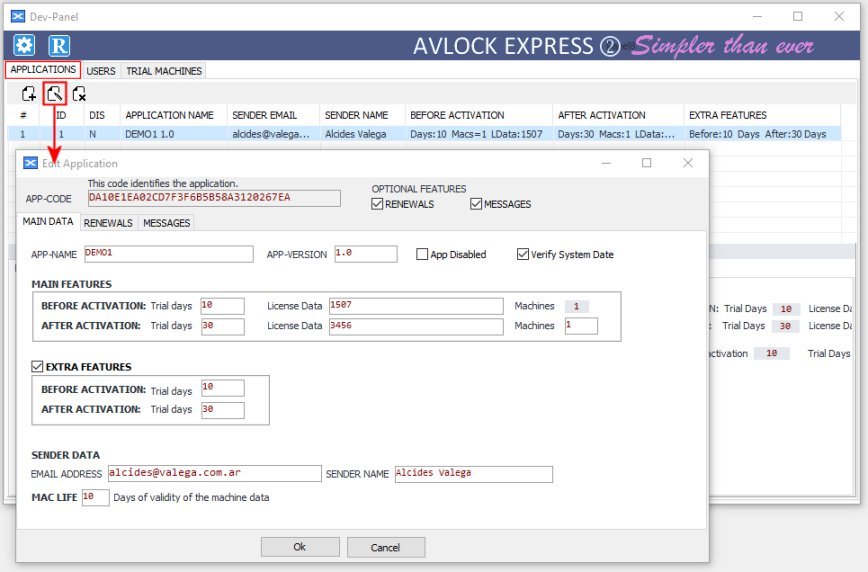
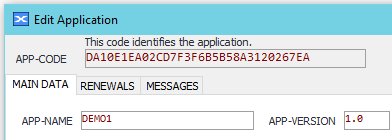
The MAIN DATA Tab
In the image above we can see the MAIN DATA tab open, the only one mandatory, the other two are optional and can be activated / deactivated with their corresponding RENEWALS and MESSAGES check boxes above.
Here are the APP-NAME and APP-VERSION fields and the check boxes to disable the application and another to enable the system date verification.
Main Features and Extra Features
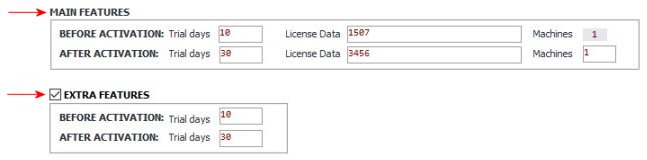
Main Features refer to the application itself. It allows to control the start and end date of the authorized period, the number of machines allowed and through the field LicenseData control the modules of the application.
Extra Features (optional) refer to some additional features that need to be administered independently with their own start and end dates of the authorized period. The most common use is for Support.
Before Activation and After Activation
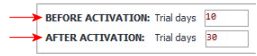
There are two steps in the registration process. Each with their own trial days.
1. Before Activation: When the user starts the app the first time, it will create a 'machine' record in the database, wich will store the license data to control the app for a trial period while the app is not yet activated. I refer to these machines as 'Trial Machines'.
2. After Activation: When the user activates the app, entering his personal data, this will Create the 'user' record which will save the license data for a new trial period, and will also add the trial days of this second period. The 'machine' record will have no effect anymore.
Sender Data and Mac Life

Sender Data: The email address and the name of the person who sends the emails. This data will be used for emails sent from the Dev-Panel and also by automatic notifications.
Mac Life: It is the time in days that a machine can run without accessing the OLM to obtain updated license data.
The RENEWALS Tab
Through this feature users of your application can renew their licenses directly from the application and making payments with PayPal.
In this tab, you can define the renewal options that users can select from a list that will be displayed in the application.
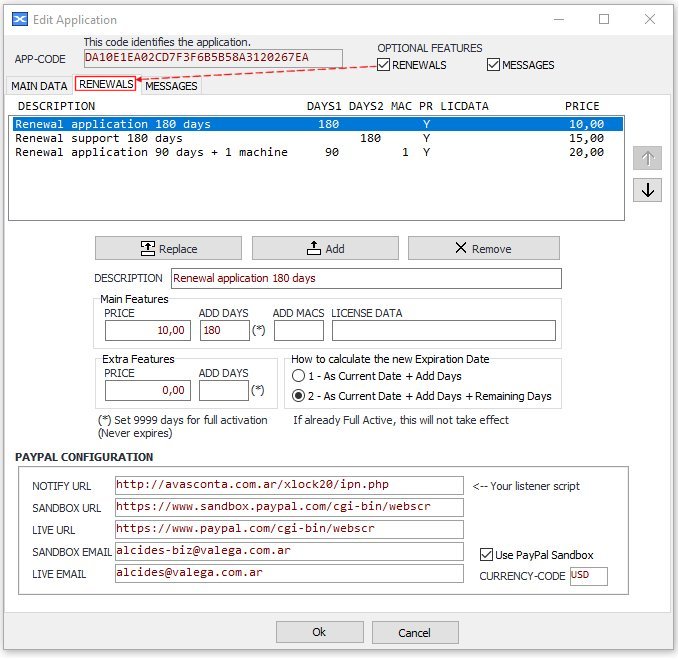
The way to use this panel is very similar to the Delphi IDE "Library Path" shown below:
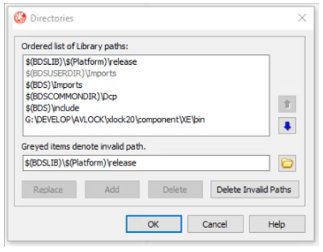
Each defined update can set one or several characteristics to change in the user's account and therefore also in the application.
You can decide if you are going to establish changes for several characteristics in a single renewal or only one. The values of the characteristics left blank will not be applied.
PayPal Configuration:
Notify URL: URL pinting to your ipn.php script into your server (the listener)
Sandbox URL: You can use this URL to make your practice. To enable it you should check the "Use PayPal Sandbox" checkbox.
Live URL: This is the PayPal Live URL. Use it in production.
Sandbox Email: Email address from your business sandbox account defined at https://developer.paypal.com
Live Email: Email address from your live PayPal account.
The MESSAGES Tab
Here you can define custom messages that will be automatically sent to the user under certain events or license status.
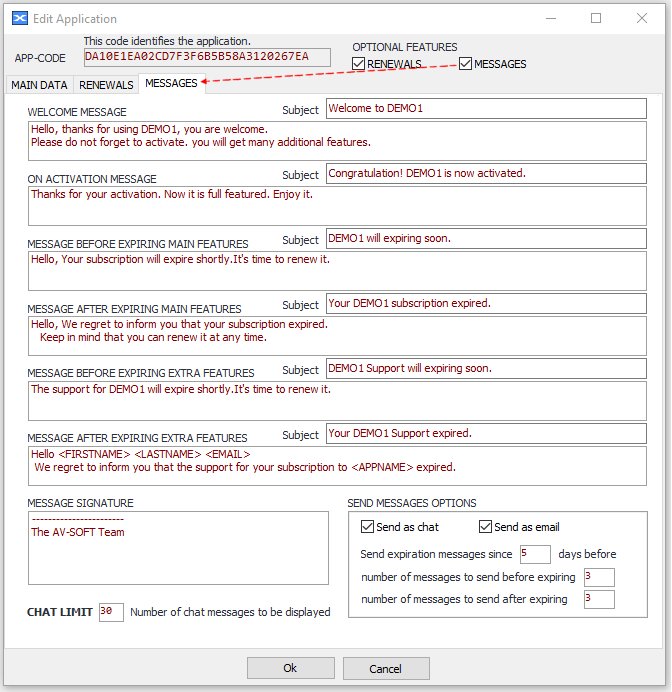
Welcome Message: Message sent to the user when the application runs for the first time.
On Activation Message: Message sent when the user activates the application.
Message Before Expiring Main Features: Message sent when the application is about to expire.
Message After Expiring Main Features: Message sent when the application is expired.
Message Before Expiring Extra Features: Message sent when the Extra Features is about to expire.
Message After Expiring Extra Features: Message sent when the Extra Features is expired.
Message Signature: Signature to be added at the bottom of each message.
Send Messages Options: Here you can define some options, such as whether the messages will be sent as emails and / or chat messages. From how many days before they will be sent and how many messages will be sent. However, only one message will be sent per day.
Chat Limit: It is the number of most recent Chat messages that will be displayed in the user's application.
The USERS Tab
Here you can see the list of users, with their corresponding data. It is a paged list thus avoiding the download of the complete list at once.
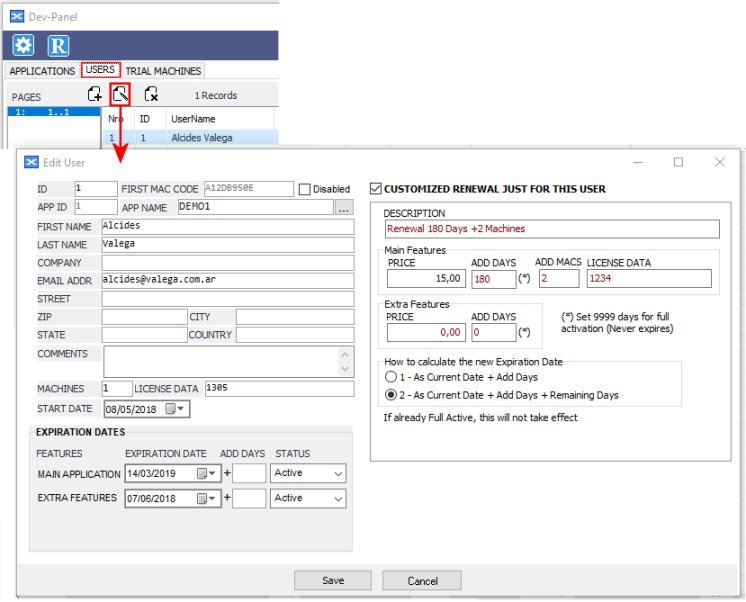
Below is the form for editing a user account:
There are two ways to create a user account, namely:
1. You can create it by entering the data yourself and then passing the activation code to the user to activate your application or
2. Through the activation process performed by the user from the application generates a user account based on the data entered by the user and the configuration of the application.
The Basic Data

The ID, MacCode and AppID fields are readonly. The MacCode is set by the activation process with the MacCode of the user machine.
The User Data
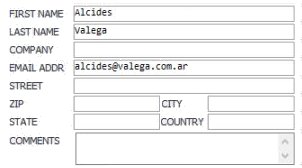
This will allow you to know the user's data. When the user activates the application, only the name, surname and email address are mandatory
The License Data
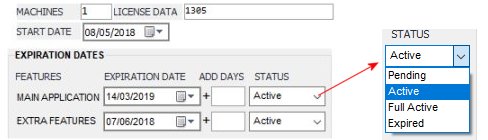
Machines: The number of machines that can be run at the same time.
License Data: A string data that allows you to configure and enable / disable modules of the application.
Start Date and Expiration Dates. Two time periods are defined, one for the main application and other for the extra feature. The start date is unique for both, but the end date (expiration) is proper for each period.
Status Here it is possible to set a status for both features. This status can be set manually for you or automatically when the period ends.
The Renewal Data (Optional)
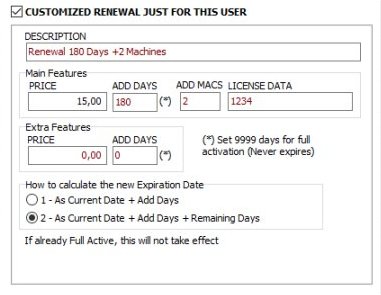
Here you can define a customized renewal just for the user. This will be displayed in the app together with the renewals defined in the application data.
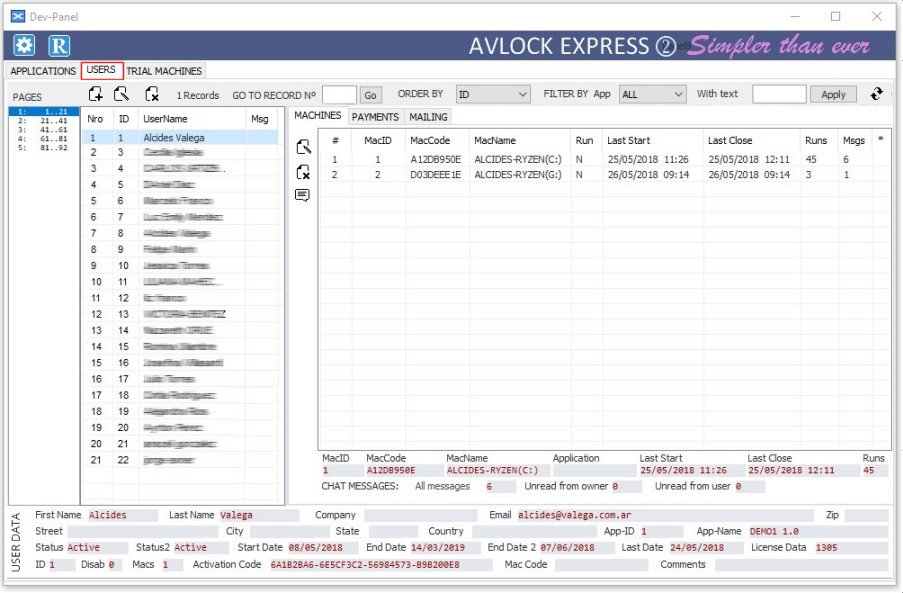
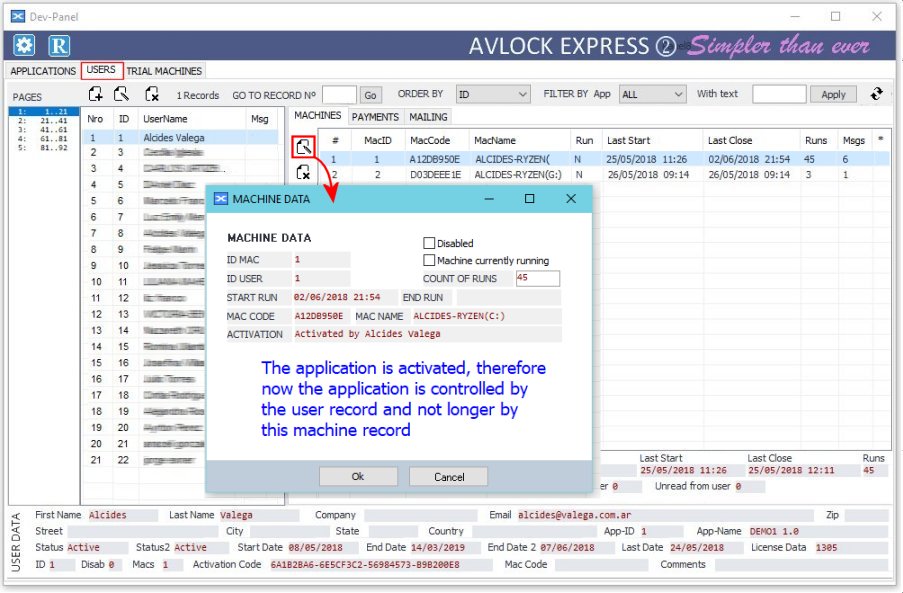
The TRIAL MACHINES Tab
The machine records shown here are in the first stage of the registration process. Just after the user started run the app and before activation.
The creation of these machine records are requested from the application when the user executes it for the first time.
Each machine has its own MacCode that consists of a code calculated based on the serial of the disk where it is running, and is assumed to be unique for each machine.
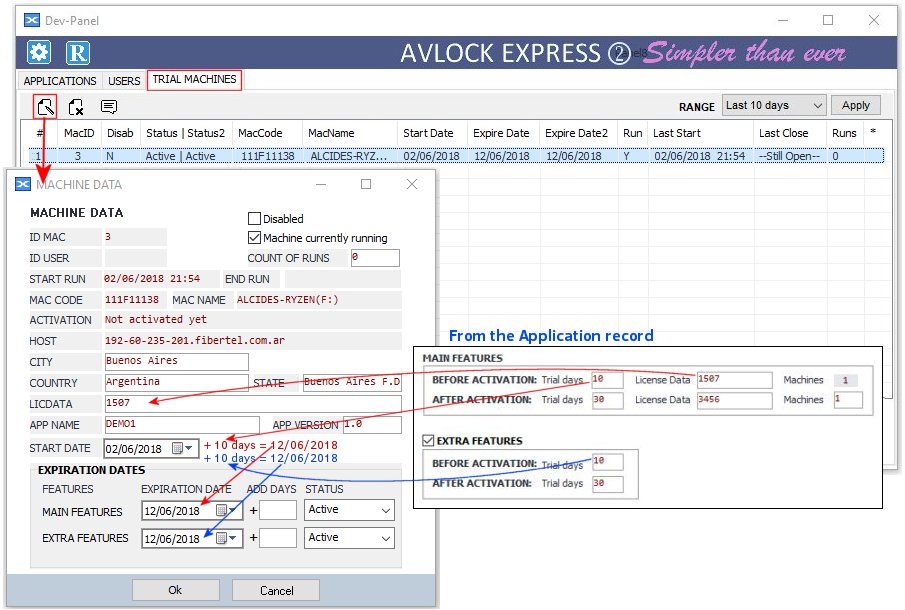
The overwriting notes and arrows are intended to help understand how the values of the fields are calculated when the record is created.
You can modify the license data, change the expiration dates and block the machine if you wish.
The User ID field is empty at this stage before activation, but when the activation is done, the User ID is assigned with the ID of the new user record created. Then, from now on, the machine will belong to this new user, and will disappear from this list of "Trial Machines", and will apear in the USERS tab as belong from the new user. See the image below:
Examples
Here we will see two examples that will guide you to implement your own application using AVLock Express.
The Example 1
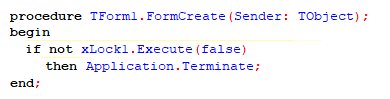
Example 1 is the simplest of the two. Here we will see how it is possible to implement it with a single line of code.

One single line of code
With this single line of code it is possible to control the application with AVLock Express. In this case, if the authorized period expires the application closes.
Assign component properties
However, you should not forget to assign the appropriate values to the properties of the component, as you can see below:
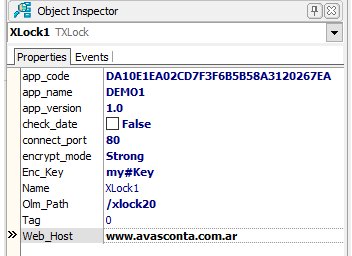
app_code, app_name and app_version: Here you must enter the existing values in the application record from the Dev-Panel. See the image below:.
check_date: Check this checkbox if you want to check the system date when the application starts.
connect_port: For http use 80, for https use 443.
encrypt_mode: Choose between Strong and Fast.
Enc_Key: The encryption key used to encrypt the data transferred between Delphi and the OLM. The same key entered when you installed the OLM.
Olm_Path: The folder where the OLM is located in relation to the folder where your domain is pointing.
Web_Host: Enter here the domain associated with your server, in the format www.yourdomain.com. Usually the domain is associated with the public_html folder and we are going to assume that this is the case.
The complete source code

The Execute method
The Execute method takes a boolean parameter and return a boolean value. 
The Execute method checks the registration status, then if (force=true) or the registration status have some issue, then a registration form is displayed, where the user can see their registration status and some activation or renewals options.
In the OnCreate event we call the Execute function with the parameter (force = false), in this way the registration form will only be shown if there is a problem, such as when the authorized period is about to expire or is already expired. See the code below:

Execute returns true unless you have disabled the machine or the user from the dev-panel. You can see the result of the Execute function checking the reg_status property, this could take the following values: 0=PENDING, 1=ACTIVE, 2=NEVER-EXPIRES, 3=EXPIRED, 4=DISABLED. Note that Execute return False when (reg_status=4). Also the Execute method sets the machine RUNNING field to 1, indicating the machine is at run status.
Also in the example we include a button to access the registration form with (force = true). From here, the user can access this form at any time.

The Registration Form
This form is called with the Execute function. There are three tabs: Activation, Status and Renewals. See below all related forms:
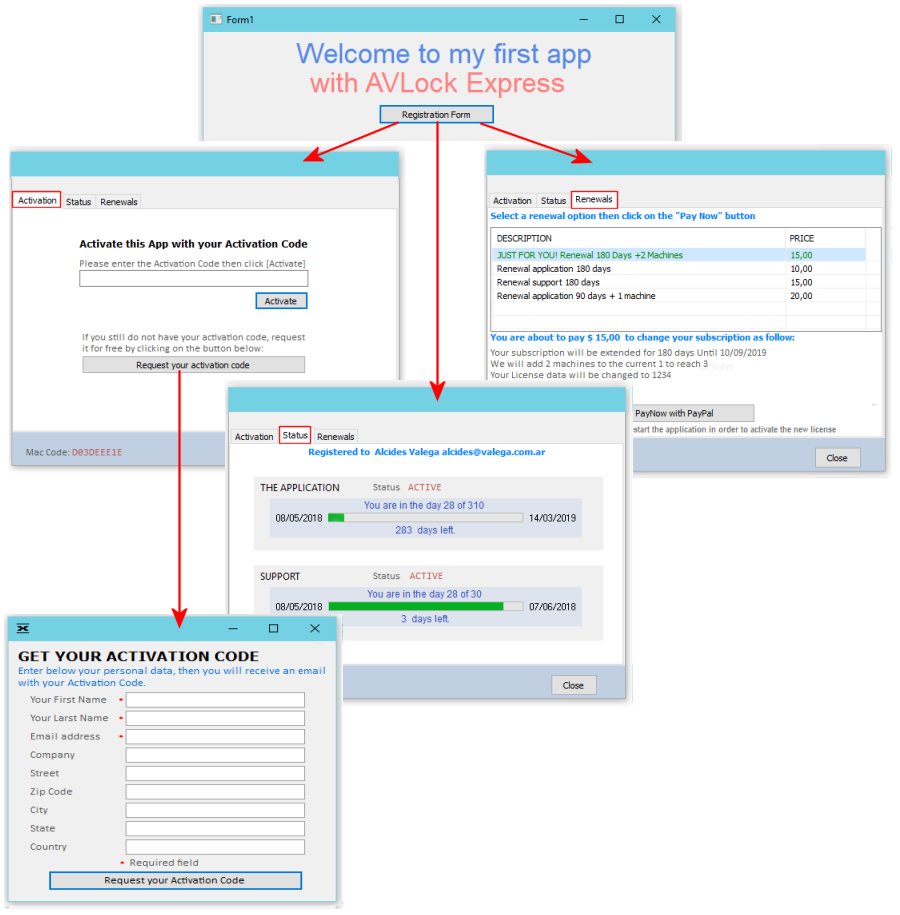
Activation Tab: Here the user can activate the application by entering the activation code and can also request the activation code by entering their personal data, then receiving the code via email.
Status Tab: Here the users can see the status of their accounts and the authorized periods for the main and extra features.
Renewals Tab: Here the users can update/upgrade their accounts by selecting a renewal option and make the payment via PayPal.
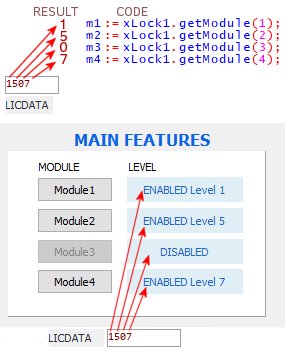
The getModule function
In the setModules procedure we use the getModule function to check the status for each module. See below the relationship between the Licence Data and the Modules:
Detach Machine
The detachmachine method is called in the OnClose event in order to mark the machine as closed (sets the machine RUNNING field to 0).
The Example 2
In example 2 we added the CHAT feature and moved of place some buttons

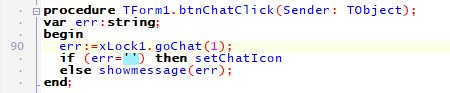
Changes made to the code
This is the code for the CHAT button.
The goChat method

This method calls the CHAT system. From the app you should use (origin=1) which means "The application". I used (origin=0) in the Dev-Panel.
The CHAT feature allow you to comnicate with the user still before activation. Also some automatic notifications could be sent to the user for some special events.
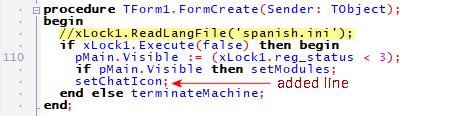
The setChatIcon method
This method place the appropriate image to the chat button, indicating if there are unread messages.
Please note that the Execute method also download new messages if any, so we added the line "setChatIcon" there to refresh the image of the Chat button. See the image below: