NOTE: This information applies to version 5.x. Everything mentioned is also generally valid for version 6, only new scripts and functions added in version 6 are not mentioned.
Items
What is the Online License Manager?
How to install the advanced version onto your web server?
For what reason should you modify an OLM record?
How to use the edition panel for each case?
WHAT IS THE "ONLINE LICENSE MANAGER (OLM)"?
|
The Online License Manager (OLM) is a interface between the AVLock SIMPLE component and an internet web site. This allow to the AVLock SIMPLE component request from the web server the generation of a registration key, to save it into an online database, and save also another data about the machine and the user into the online database. etc.
There are two versions of the Online License Manager (OLM), the basic version and the advanced version. These are sets of php scripts to be installed into your web server in order to manage online licensing functions and are accessible from your application through a set of methods created for this purpose. |
THE BASIC VERSION
The basic version is made up by three php scripts; basickeymanager.php, checkdate.php and genkeys3lib.php. To install it please create a folder (e.g. '/olm5') under the /public_html directory then copy into these files, also create the /olm3/temp folder in order to hold the key files created from the applications when the users starts its trial periods.
Then you will have a scheme like this:.
/public_html
/olm5 <---- (basicolm.php, genkeys4lib.php)
/temp
THE ADVANCED VERSION
The advanced version is made up by 7 php scripts plus a javascript file which installed will look like the following scheme:
/public_html
/olm5 <--- genkeys5lib.php
basicolm.php
avlocks5_inc.php
advancedolm.php
s5cp.php
edit.php
s5createtable.php
sorttable.js
s5.css
edit.gif
back.png
/temp
This set of files allow you to accomplish the whole licensing cycle for your application namely; 1) to start the trial period 2), to extend the trial period if needed, 3) to purchase your application 4) to activate your application by the user, and 5) to move the license to another computer. The examples shows how to implement each one of these steps.
There are some properties into the component to hold the OLM path and the names of the most used php scripts, namely:
Property |
Value |
OlmPath |
/olm5 |
OlmAdvScript |
advancedolm.php |
OlmBasicScript |
basicolm.php |
So, if you change the name of some script, you also will need to change the relating property value.
There are a lot of methods to access to the OLM using each the proper script:
Method |
Script |
OnlineCheckDate() |
checkdate.php |
OnlineGetKeyB() |
basickeymanager.php |
OnlineStartTrial() |
advancedkeymanager.php |
OnlineExtendTrial() |
advancedkeymanager.php |
OnlineRegisterKey() |
advancedkeymanager.php |
OnlineRenew() |
advancedkeymanager.php |
OnLineSynch() |
advancedkeymanager.php |
OnLineStartSecondary() |
advancedkeymanager.php |
OnLineMovePrimary1() |
advancedkeymanager.php |
OnLineMovePrimary2() |
advancedkeymanager.php |
OnLineRestorePrimary() |
advancedkeymanager.php |
OnLineMoveSecondary1() |
advancedkeymanager.php |
OnLineMoveSecondary2() |
advancedkeymanager.php |
OnLineRestoreSecondary() |
advancedkeymanager.php |
OnLineRemoveReg() |
advancedkeymanager.php |
OnlineFullSynch() |
advancedkeymanager.php |
The advanced version includes the control panel (s3cpanel.php), an online utility to access to the online database in the web server in order to see and edit registration data. both versions are installed into http://av-soft.com so you can use them when you try the component.
The basic version is included with the standard edition and the advanced version with the professional and developer editions. After purchase you will be able to modify and adapt them to your own needs and install them into your own web server. For more information please see the Online Licensing Manager topic.
HOW TO INSTALL THE ADVANCED VERSION INTO YOUR SERVER:
The first step is to edit the configuration section into the avlocks4_inc.php file entering your own values as shown below:
//*****************CONFIGURATION SECTION************************
$sql_host="localhost"; // Host for the MySql server. Normally localhost
$sql_user="your_username"; // Mysql user name
$sql_pass="xxxxxx"; // Mysql password
$sql_db="your_dbname"; // your MySql database
$sql_table="avlockusers"; // table for the avlock simple data
//**************************************************************
Then create the olm5 folder (or any other) under the /public_html folder into your web server and copy into all files of the advanced OLM.
As next step you need to create the database table into your web site, then, supposing you have as domain "mydomain.com" enter from your browser (Internet Explorer, Firefox, etc.) the following URL: http://yourdomain.com/olm5/s5createtable.php
then you will see the following message "table created successfully", if so you can remove the s4createtable.php from your server since this will not be used anymore.
The records into the table will be added when the users starts the trial periods into his computers. In order to access to this information you will need to use the control panel as explained below.
HOW TO USE THE CONTROL PANEL:
Related Items: How to register an application using the OLM?
If you did install the advanced OLM onto your web server how described in the previous section, then using your web browser (Internet explorer, Firefox, etc.), enter the following URL: http://yourdomain.com/olm5/s5cp.php.
However, if you did not installed the OLM onto your web server, you could use the OLM from my web site by entering this URL:
http://av-soft.com/olm5/s5cp.php.
Immediately you will see the following screen:

Enter the password abc123 then click the [->Go] button. Then will bring up this screen:

In "Search for" enter the search argument, a number or code to find, and for "Into the Field" select the field where it should be found. In this example we want to find the records which AppID are equal to 12306 (corresponds to our example 6). Finally we click on the button [-> Go] and see the corresponding records displayed as shown below:

In this case a single record corresponding to the primary license. Secondary licenses would be displayed in gray as shown below:

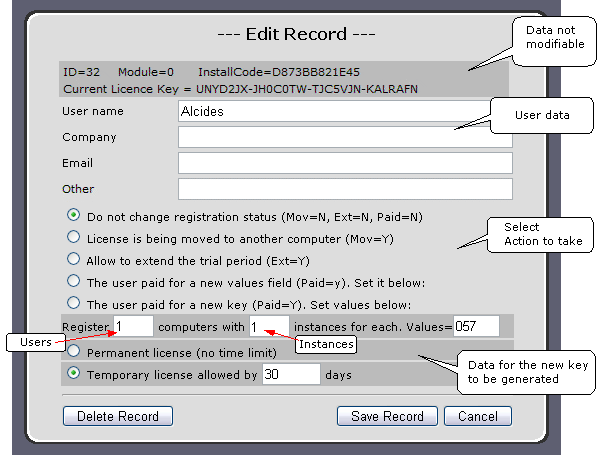
Clicking the Edit icon to the right of each record, you will enter to the following edit box where you could make necessary changes and save them with the [Save Record] button.

In AVLock SIMPLE v5.1.3 is added a new alternative control panel composed by the scripts cp5.php and ed5.php files. Here we see some screen shots:

You can evaluate this control panel from my site at http://valega.com/olm51/cp5.php. Enter the password "mypass", then click on the [Go] button, then the first page of records will be displayed.

Below we can see a detailed picture of the fields that make the record and the role of each.

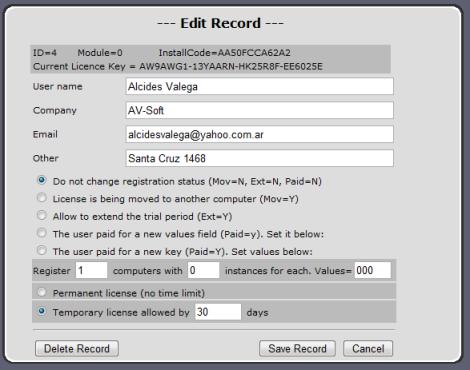
We click on the Edit icon, then the well known edit screen is displayed.

FOR WHAT REASON SHOULD YOU MODIFY AN OLM RECORD?
1) To grant a new license: When the user made a payment for a new license could be by:
a) A new period in the event of temporary licenses.
b) The acquisition of a license,
c) any change in the license conditions determined by the field values.
d) To extend the current trial period.
2) You want to set the record as moved to another computer: You could need this for cases where the user computer crashed, therefore the user can not make this step from his computer and you must do it from here.
3) When you want to correct the user data.
HOW TO USE THE EDITION PANEL FOR EACH CASE?
Here is a group of 5 radio buttons, each with a specific purpose:
( ) Do not change registration status (Mov = N, Ext = N, Paid = N)
Select it to modify the user data without changing the conditions of the license.
( ) License is being moved to another computer (Mov = Y)
Select it to indicate that the record is being moved to a new computer.
( ) Allow to Extend the trial period.
Select it to enable the user to extend the trial period. When your application executes the OnlineExtendTrial() method from the user computer, the OLM will generate a new registration key to be stored in the OLM and local registration data.
( ) The User Values paid for a new field (Paid = y)
Select it to indicate that it must generate a new registration key with a new field "Values", but maintain the same values that determine the validity and scope of the license (Days, Users and instances). You must enter the new field "Values".
( ) The user paid for a new key (Paid = Y)
Select this to granting a new license with new values that determine the validity and scope of the license (Days, Users and instances) and optionally also a new field "Values". You must enter the new values below. If this is a definitive license select the radio button "( )Permanent License (no time limit) and if this is a temporary license select"( )Temporary license" entering the days that correspond to the authorized period.
