NOTE: This information applies to version 5.x. Everything mentioned is also generally valid for version 6, only new scripts and functions added in version 6 are not mentioned.
Items
How AVLock protect your software
The properties InstallCode, InstallCodeSources, etc.
Meaning of each field into the registration key
Start the trial Period with the Basic OLM
Start the Trial Period with the Advanced OLM
How To Register the Application using a Registration Key
How To Register the Application using the OLM
The Methods WriteAppData and WriteKeyData
The Methods ReadAppData and GetKeyData
HOW AVLOCK PROTECT YOUR SOFT?
What is what we want from a licensing system?
One of the first things that anyone would want is do not allow that your software product can run freely on all computers. We would like to have a mechanism to prevent an unauthorized user to use our software. One of the ways used to achieve this is by linking the application to any special information from the user or the computer where it will run.
For example, we might think link our software to some special value from the hardware of the computer where you run the application, different to any other computer, that way we could get a totally different serial number for each computer.
AVLock calculates a special code called "InstallCode" for each application protected with AVLock. The InstallCode can be calculated from several sources; based on hardware or based on user data. The sources used for this purpose are defined in the InstallCodeSources property.
Let us see briefly what are the steps that AVLock does when the application runs:
1. The InstallCode property is calculated at run time based on the hardware or user data.
2. This InstallCode is compared with other InstallCode saved into the registration data usually found in a file (*. avr) in the same folder of the application.
3. If they match the values of both InstallCode is considered that the application is registered (licensed) and authorizing the execution. Otherwise if no match or no such file *. avr, it is considered that the application is not registered and not allowed to run.
Here is a new item, "Registration Data". I guess the first thing you're thinking is that the file *. avr with the registration data should not be so exposed, and instead of being there in the same folder of the program where anyone can attempt to edit or delete it with the purpose to deceive our security mechanism. Perhaps it would be more convenient put it in a safer place and hidden from view by hackers or malicious users.
Personally I think the security should not be based on hiding data. Hackers are very skilled to find hidden things. Security should be based on more solid principles. Note that the file *. avr, despite being a plain text file, it is strongly encrypted. If someone modifies or deletes this file, all they would gain is that the application to stop working.
Perhaps you have some doubts about what I just said. Well, I'll make a challenge. Take an example that does not use the method MakeTrial() and try to break the protection of AVLock manipulating the file *. avr. Delete, modify, copy it from one computer to another, etc. Then, if you really break the protection, I will reward you by giving you the Developer edition including all source code.
Here is a sample of the registration file:
Filename: EYPMKNUC.avr
Contents of the file:
0=E4136D422D8E489928EE46904821F9BCB2E92CF51E58C04255E6386121F000C4B51C967C6F176399F9A0B644691A8BC21AC211948DB0B409BF784EA3CD139073CCCB5C9BDDEEE7F2D040E149AAE33CA0
ld=NA2413WMZ5PE72LA8
ad=8A71087BAFF0F0DB10A7A56851DD47A1E3D9DEE79B316E0096E3792277C65F86F7ED26A3CC17F82C97B0888020D7E0A261F618D6FE1AFEA36B922B1521626AAFD3B3D1F306E5F170910ADDE4829AEB2D
We see here three entries, "0 ", "ld" and "ad ". The first "0" is the registration key. For each key there is an entry with a numeric value between 0 and 254, which is the index of the key. For most cases only need to use a key, commonly is used index "0" as in this case.
What information is stored within these entries? and, what is the content for the entry "0" ? We see that this is in hexadecimal strings. They are strongly encrypted with the Rijndael algorithm (AES). We can see the contents of this file with the utility DataCheck, below, we see a picture of it:
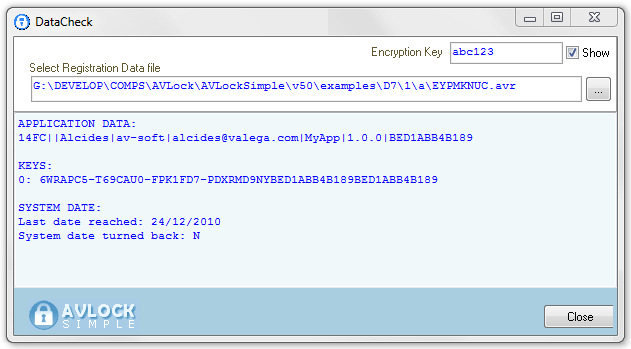
You must enter the encryption key to access the data. Then, using the [...] button, select the file (*avr) to see its content:
Here are three sets of data:
1. APPLICATION DATA

Checksum: Checksum to verify the data integrity.
OtherCode: (Corresponds to the OtherCode property) can be used to store additional information about the user as being ID, address, etc.
UserName : (Corresponds to the UserName property).
Company : User Company (Corresponds to the Company property)
Email : User Email (Corresponds to the Email property).
The User data can be selected to take part in the formation of the Installcode, for example in the following configuration:
InstallCodeSources := User_Data;
UserSources := [User_Name, User_Company, Email_Address, Other_source];
More details later in InstallCode, InstallcodeSources, etc.
AppName : Application Name (Corresponds to the AppName property)
AppVersion : Application version.
InstallCode : (Corresponds to the Installcode property). It is a copy of the local Installcode saved with the registration data.
2. KEYS

KEY: Registration key
MOVED: Is 'Y ' when the module was scheduled to be moved to another computer and 'N' for normal registration.
PRIMARY: Is 'Y ' for Primary Registration and 'N' for secondary registration.
PRIMARY INSTALLCODE: On secondary registrations is the InstallCode coming from the Primary Computer from where it depends and for Primary Registrations is the same as the Local InstallCode.
LOCAL INSTALLCODE: Corresponds to the Installcode from the local computer.
3. SYSTEM DATE
It allows to see what is the highest value ever reached by the system date while the application runs. "Last date reached ". This allows us to infer that if this date is greater than the current system, probably the system date was modified (to back), possibly to deceive the AVLock security mechanism and use a trial period after the deadline.
Let's review again the steps that AVLock does to validate a registration key.
1. When the application starts, the InstallCode property is calculated based on data obtained from the hardware or the user.
2. This InstallCode is compared with a copy of the InstallCode stored together the registration data into the (*. avr) file, normally into the application folder.
3. If they match, the application shall be considered registered
(licensed) and authorized execution. Otherwise, if no match or no such file *. avr, it is considered that the application is not registered and not allowed to run.
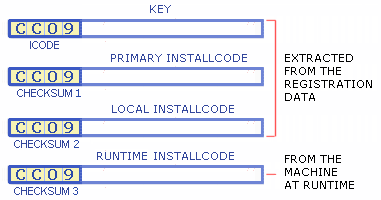
In fact the comparison is not done in all cases for the full InstallCode since the Key saves only the short code (CHECKSUM) corresponding to the ICod property. The verification process will take the following steps:
a) The CHECKSUM (Icode) is extracted from the key saved with the registration data.
b) This Icode is compared with the CHECKSUM of the primary InstallCode extracted from the registration data. These must match.
c) It is compared the full local Installcode extracted from the registration data with the one calculated at runtime from the hardware or user data on the local computer. They must also match.
On primary installations all short codes should be the same, CC09 in the example below:
For secondary installations (see example 3), ICODE must be equal to CHECKSUM1 and CHECKSUM2 equal to CHECKSUM3. See the image below:
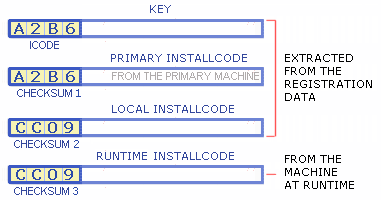
At the registration process, the key is concatenated with the InstallCode coming from the primary registration and with the Installcode coming from the local computer. Then this string is strong encrypted and saved with the registration data into the local disk.
Now we will see in more detail each of these elements part of the security mechanism of AVLOCK.
THE PROPERTIES:
- INSTALLCODE
- INSTALLCODESOURCES
- MACHINESOURCES
- USERSOURCES
In the component we have defined the following data types:
TInstallCodesources = (Machine_Data, User_Data, Removable_Disk);
TMachineSources = set of (System_UUID, BaseBoard_SN, Reg_File, HD_PNPDeviceID, HD_SN, HD_Signature);
TUserSources = set of (User_Name, User_Company, Email_Address, Other_Source);
Each of these types of data defines a different property of the component. These properties together allow to define the sources to be used to calculate the InstallCode property.
The InstallCode property is used to store a code that identifies an installation of software on a given computer.
Each time the application starts, AVLock calculates the InstallCode value based on the sources defined in the InstallCodeSources property.
Has the following format: XXXXXXXXXXXX
Example of InstallCode: BED1ABB4B189
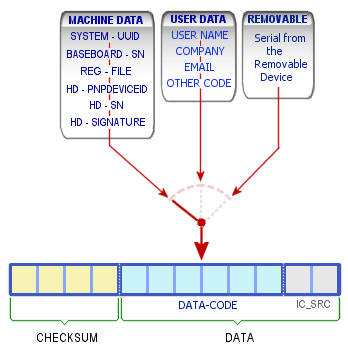
Internally comprises three fields: DATA-CODE, IC-SRC and CHECKSUM. The checksum field is calculated as a sum of the previous two and used to verify its integrity.
The value assigned to the DATA-CODE field is obtained from various sources that can be classified into three groups:
1) MACHINE DATA: These are values obtained from the hardware.
2) USER DATA: These are the user data; Name, Company, Email, etc.
3) REMOVABLE DISK: Serial Number obtained from the removable drive where you installed the application.
You must choose one of these three groups because you can only use one of them. The group is defined using the property InstallCodeSources. Below you can see three possible configurations
1) InstallCodeSources: = Machine_Data;
2) InstallCodeSources: = User_data;
3) InstallCodeSources: = Removable_Disk;
As we see, InstallCodeSources works as a switch for selecting the group of sources used. Each of these groups has in turn a set of options to select. The options for each of the groups are:
MachineSources define the options for Machinne_Data. Could take the following values:
System_UUID: UUID (Universally Unique Identifier) is a number calculated by the Windows WMI service based on various system parameters which in principle should be different for each computer.
BaseBoard_SN: Is a number extracted from the parameters of the motherboard.
HD_PNPDeviceID, HD_SN y HD_Signature: These are numeric values extracted from the parameters of the hard disk.
Reg_File: Is a numerical value obtained by the registration file name *. avr including the path, for example: c: \ appfolder \ L9G4682R.avr. Thus if we include this option, the Installcode also will depend on the location that has the application on your disk. It can be useful when you want to control the number of instances of the application that the user can run simultaneously, if not used Reg_File the user can copy all files in the application folder to a different folder and so achieve double the amount of instances allowed.
After defining the group with InstallCodeSources, you should define the sources of the selected group. For example:
For the group MACHINE DATA may be:
InstallCodeSources: = Machine_Data;
MachineSources: = [System_UUID, BaseBoard_SN, Reg_File]
Reg_File is the full path and filename for the registration file, normally located into the app folder. e.g.
c:\myappfolder\EYPMKNUC.avr
If you want to control the number of concurrent instances then you would like to add Reg_File to the MachineSources. that will produce a different Installcode if you call the application from a different folder. This will avoid that some users copy the app folder to another location in order to duplicate the number of available instances.
For the group USER DATA may be:
InstallCodeSources: = User_data;
UserSources: = [User_Name, Email_address]
For REMOVABLE DISK do not need to define a group of sources as this is one, so just define the following:
InstallCodeSources: = Removable_Disk;
Below we can see an outline of what we were explaining
|
|
Note that IC_SRC is a field of 1-byte length that holds the configuration of the InstallCodeSources used to calculate it.
It is relevant to mention here the CodeCheck utility that lets you see the values of the fields within a given InstallCode.
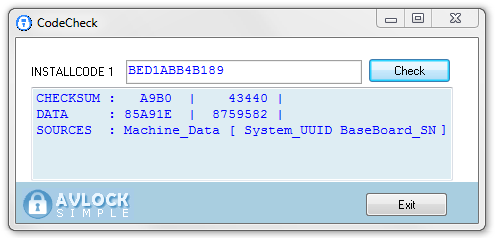
We see this Installcode was calculated with the following configuration:
InstallCodeSources := Machine_Data;
MachineSources := [System_UUID, BaseBoard_SN];
CHECKSUM is a number obtained based on the sum of all the other fields, which is also used as a short InstallCode, this value is assigned to the Icode property.
REGISTRATION KEYS
Registration keys are codes with the following format: XXXXXXX-XXXXXXX-XXXXXXX-XXXXXXX with a total length of 31 characters. A registration key has internally fields of data used to control your application. Please see represented below these fields and its sizes:
Fields of a Registration Key:

Field length type
------------- ---- -----
Days 4 word
Users 2 byte
Instances 2 byte
Startdate 4 word
Index 2 byte
iCode 4 word
AppID 4 word
Values 3 hex string
KeyType 1 nibble
Checksum 2 byte
----
Total length 28
These fields are concatenated into a single string, then strongly encrypted with the Rijndael algorithm then formatted with hyphens to make it more readable, e.g. 98RAWTV-9GP5KLK-T7RMRW9-AD305UQ
Meaning of each filed into the registration key
Days
Authorized days for the trial or temporal period. For permanent keys this field is 65535.
Users
Number of users who will share the same registration key through the OLM. A different record will be created by each user.
Instances
Number of instances running at once into the computer.
StartDate
Date where start the authorized period for trial and temporal keys. For permanent keys this field is 65535.
Index
The key number. Number to identify the key into the registration data. Byte value between 0 and 254.
iCode
Is the checksum of all data fields into the InstallCode property coming from the hardware and other sources. This is included to be compared later with the one coming from the computer where the application is installed in order to verify it.
AppID
Number to identify the application.
Values
It consists of three Nibbles (1.5 bytes). This multipurpose field was added in version 3.0 and allows you with one key control many options in its application, thus eliminating the need to use multiple keys to control your application. In the examples you will see how this can be used in various ways. See decodevalues() function that takes the three nibbles and converts an array of booleans. See also in the ShowRegData() procedure how this converts the values field into a integer value of 3 Nibbles (0 .. 4095) or three integer values of 1 nibble (0 .. 15) or 12 boolean values.
KeyType
This field categorize the key with the following possible values:
0=trial, 1=temporal, 2=permanent, 3=unregister, 4=unregisterall
Add 5 for generic keys as follow: 5=generic-trial, 6=generic-temporal, and so on.
CheckSum
Checksum of all above fields. Used later to verify the Key.
THE KEYCHECK UTILITY
Also I will mention the KeyCheck utility, which will allow you to see the internal fields into a key. Here, for security reasons, before displaying the data is requested to enter the encryption key.
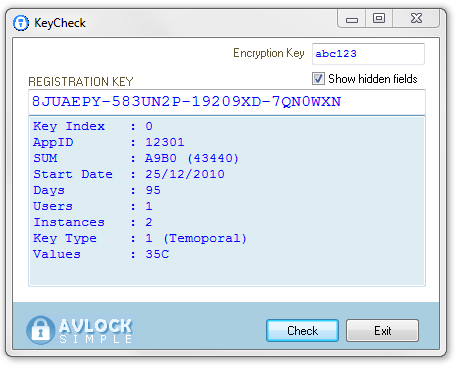
THE REGISTRATION PROCESS
The registration process includes the creation of the *. avr file, usually in the same folder of the application, containing the registration data that we saw at the beginning of this section. Within the registration data is the Key with information about the type of registration (Trial, Temporary and Permanent) and the period of time authorized for trial and temporary keys. In most cases the first thing we want is start the trial period and normally we hope this happen automatically the first time we runs the application. Then if were necessary also extend the trial period a few days and finally register the application when the user completes the payment. Let's see in detail each of these steps:
HOW TO START THE TRIAL PERIOD?
Offline methods (two options)
(1) With the MakeTrial() method: This method generates and register a key of trial type according with the parameters passed, e.g. in the following call:
MakeTrial(0,2,1,date,30,'000');
We request the generation of a trial period of 30 days for the index 0 to a maximum of 2 concurrent users allowed and only one instance, starting from the current system date. This method is called only when you first run the program, even when there are no registration data and GetKeyData () returns (Status = Unregistered).
WARNING: This method is not secure. The problem with the MakeTrial method is that the user can discover where the registration data is saved then removes it to get so an new free period.
2) Do not initiate the trial period and encourage to the user to ask from you a free trial key to initiate the trial period. This mean that your application will remain unregistered some time. I suggest you do not block the application while this unregistered period, instead enable your application with limited functionality, and encourage to the user to ask from you a free trial key to initiate a full featured trial period. See Protection schemes B,C,E and F. This method is more secure that the first one since when the user removes the registration data the application returns to its original (status = unregistered).
Online methods (three options)
For this approach we utilize the Online License Manager (OLM). For the option (1) with the basic OLM and for the option (2) with the advanced OLM. For both options the operation is totally transparent by the user and initiate a trial period automatically and the user will not need to deal with keys of any kind to get it. (3) Use the OnlineRequestKey() method to encourage the user to request a key for a free trial period.
NOTE: These methods are safe and do not need to hide the file of registration data for added security. If this file is deleted, the registration status will become expired, or regenerated from the OLM from your site in the same situation in which it was before being deleted.
Start the trial with the basic OLM:
For the basic mode is used the OnlineGetKeyB() method. This method is secure since when the user removes the local registration data, the trial status is restored to the previous state from the data saved in the web site. This mean that, if before to delete the local registration data the status was 5 days to expire, after restoring the data the status still will be the same 5 days to expire. Implemented in the example 1.
The call is made with the following line:
OnlineGetKeyB('000',0,0,30,1);
The parameters are:
'000' : Values.
0 : Kind (0=Trial).
0 : Module number.
30 : Trial Days.
1 : Authorized instances.
Start the trial with the advanced OLM:
See an implementation in Example 6 which uses the [Start Trial] configured to call the method OnlineStartTrial ().
OnlineStartTrial(0,2,1,30,'007');
The parameters are:
0 : Key index.
2 : Allowed users.
1 : Allowed instances.
30 : authorized days.
'026' : Values field.
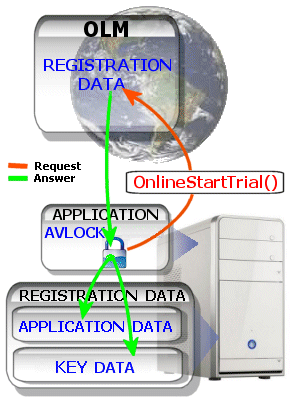
See below two schemes for the OnlineStartTrial() method.

This scheme shows more details.
|
|
For the advanced mode is used the OnlineStartTrial() method, see at the image above the steps taken to start the trial period:
1. (red). A call to the OnlineStartTrial() method like in the next line:
OnlineStartTrial(0, 2, 1, 30, '026');
In the OLM are set defaults for the trial period that will be used if parameters are passed as zero or empty values:
$trialdays = 30;
$extendays = 15;
$trialusers = 1;
$trialinstances = 1;
$trialvalues = '000';
2. (green). The script advancedolm.php into the server generates a registration key for the given module, then generates a new record into the OLM to manage this module and return the calculated key to the computer where is saved into the local registration data. If the call is made when the trial period is already started, instead to create a new record there is read and returned the key from the existing record.
Using the OLM Control Panel we can see the record generated by the call to OnlineStartTrial(). Enter the following URL: 'http://av-soft.com/olm5/s5cp.php, then enter the password abc123, onto "search for" enter 12301 and for "Into the field" select "App ID". You will see a screen like this:

Also the methods Synchronize() and OnlineFullSynchronize() starts a trial period if the record in the OLM does not yet exist, using the default values from the OLM to determine the number of days, users, instances and values field.
HOW TO REGISTER THE APPLICATION USING A REGISTRATION KEY?
|
|
The following steps must be accomplished:
1. The user send you the InstallCode. e.g. D873BB821E45
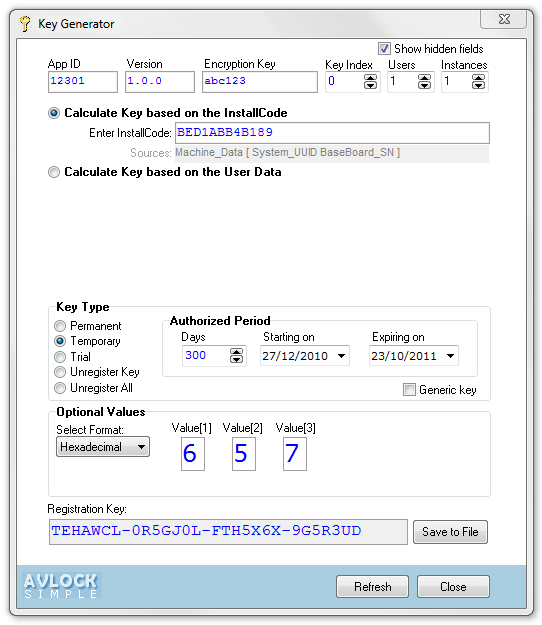
2. Using this InstallCode you calculates the Registration Key through the KeyGen utility (see the left image).
There you enter the needed fields, the InstallCode received from the user and configure the key to be generated. In this sample the key is generated for the module 0 with one user and two instances authorized, the key will be of the Temporary type and authorized by 300 days starting at 18/11/2010 and Values = 657. The resulting key for the sample is: 3PADUXC-L9E77PX-K3WLJW3-JKTRLZC
3. You send the key to the user. In this sample: 3PADUXC-L9E77PX-K3WLJW3-JKTRLZC.
4. The user register the application using the key received from you using one of these two options: ONLINE and OFFLINE. In the example 1 are implemented the Offline method (local registration only). In the examples RequestKey and UserDataBased are used both options; if found an internet connection this uses the Online option with the OnlineRegisterKey method, otherwise the RegisterKey method is used.
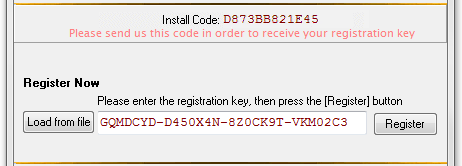
a) ONLINE: The key and other registration data is saved into the local computer and also into the OLM database. The OnlineRegisterKey() is used.

Another scheme with more details:
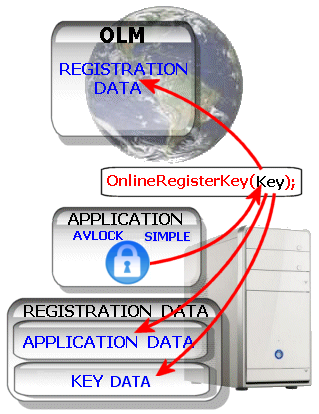
The code used in the examples include both possibilities, the online registration with OnlineRegisterKey () and the local registration RegisterKey () depending on configuration and if connected to the Internet. The code used in the example 1 is as follows:
procedure TRegForm.BtnRegClick(Sender: TObject);
var s: string;
err, n :integer;
olm :boolean;
begin
n:=testfields;
if (n>0) then begin
showmessage('Please fill out your user data then try again.');
exit;
end;
olm:=False;
s:='';
{$IFDEF ADVANCED_OLM}
olm:= connected;
{$ENDIF}
if olm then begin
//Save Uuser data into the OLM and locally
Form1.AVLock.OnlineSaveUserData(edname.Text, edcompany.Text, edemail.Text, edother.Text,0);
//register KEY into the OLM and locally
s:=Form1.AVLock.OnlineRegisterKey(trim(EdKey.Text));
if (s='50') then begin
showmessage('Key registered successfully');
GetRegStatus;
end else showmessage('Process fail, error: '+s);
end else begin
//Save Uuser data locally
writedata;
//register KEY locally
err := Form1.AVLock.RegisterKey(trim(EdKey.Text));
case err of
0: s:= 'Key registered successfully';
1: s:= 'Key Length mismatch';
2: s:= 'Your system date is incorrect';
3: s:= 'Key unregistered';
4: s:= 'Key not valid';
end;
if (err=0) then GetRegStatus;
if (s<>'') then showmessage(s);
end;
end;
b) OFFLINE:
The key and other registration data are stored only on the local computer. The code used is the same as seen above, which supports both. In this case, uses the method RegisterKey ().
HOW TO REGISTER THE APPLICATION USING THE OLM?
Related Items: How to use the control panel?
Using the advanced set of scripts php (OLM) it is possible to register the application at temporary or definitive way using the method OnlineRenew() passing with parameters the advancedolm.php script and the key index. The example 8 implements it with the [Activate] button.
This way is only possible if the related record already exists in the OLM, previously created when started the trial period. The user will be able to activate the new registration only if you previously change the related record and set Paid = 'Y', this could be accomplished with the control panel or with the RegMonitor utility.
Let us first see how to do it with control panel OLM. Enter the url "http://av-soft.com/olm5/s5cp.php", then enter the
password "abc123", finally in "Search for" enter "12341" and select the "App ID" field. You will see a record similar to that shown
down.

Clicking the Edit icon to the right of each record, you will enter to the following edit box where you could make necessary changes and save them with the [Save Record] button.
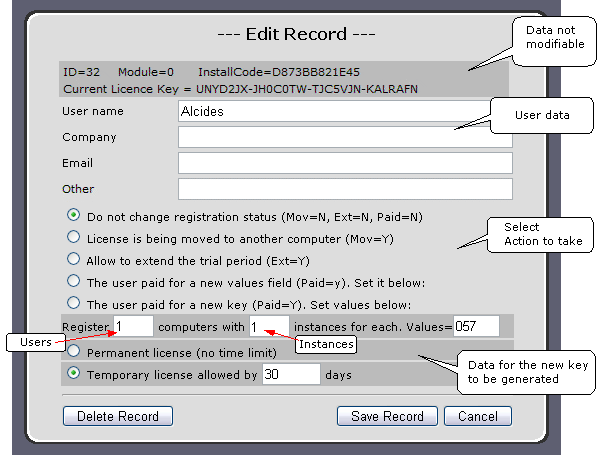
In order to prepare the OLM to generate a new registration key we should select the following option:
![]()
then enter the proper values for the fields Users, Instances and Values. Select the kind of key as Permanent or Temporary and for this latest choice also the number of days to authorize.

Finally click the [Save Record] button. You will see this message:
Now hit the [->Go] button and see the new values for the record which define the new key to be created.

LOS METODOS WRITEAPPDATA() y WRITEKEYDATA()
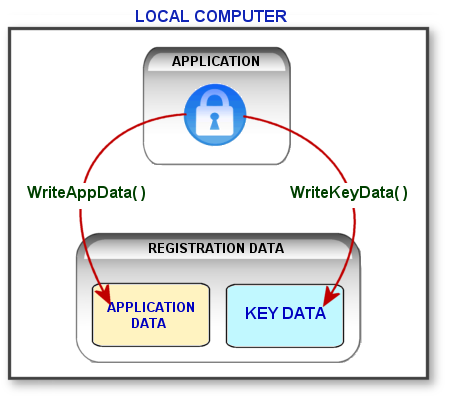
The first of these, WriteAppData is used in several examples to store user data, but the second WriteKeyData only used internally by the component.
|
The WriteAppData() method takes the registration data from the properties of the AVLock SIMPLE component into the application and then saves it into the *.avr registration file into the local hard disk.
The WriteKeyData() method takes as parameter the Registration Key to be saved and writes it into the *.avr registration file into the local hard disk.
LOS METODOS READAPPDATA() y GETKEYDATA()
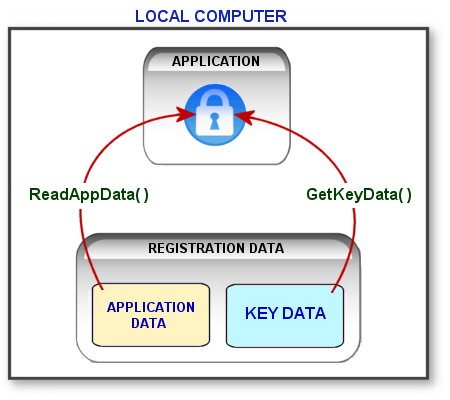
The first ReadAppData () is only used internally by the component, but the second, GetKeyData () is used in all examples.
|
. |
The ReadAppData() method reads the registration data for the application from the *.avr registration file into the local hard disk and then uses it to fill the AVLock SIMPLE properties into the application.
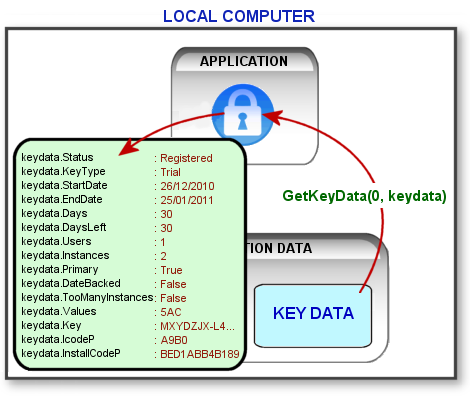
The GetKeyData() method reads the registration data for a given Index from the *.avr registration file into the local hard disk and then uses it to fill a record of type TKeyData into the AVLock SIMPLE component.
Now let's see these fields with more details. In the example we request the key from the index 0.
|
|
With AVLock SIMPLE it is able to manage until 254 keys for each application, although never you will need all them. However with only one we can take control of the application starting a trial period the first time that the application runs, then checking the key status using the GetKeyData() method each time that the application starts, in order to show the adequate message and allow to the user to continue running the application or blocking it if the time of use has expired or the system date have been backed on or the max number of instances allowed has been reached.
The Values field can be very useful to simplify the use of AVLock SIMPLE, allow with a single key control the main application and enable / disable various options and features in your application. Now with this new feature only rarely will need to use more than one key in your application.
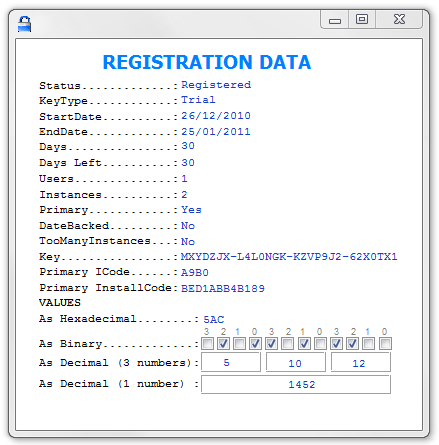
Into some examples there is the button [Show Registration Data], which displays a form with all registration data from the current application.
|
Here you see the data fields extracted from the registration key for a given Index using the GetKeyData() method, where you pass as input parameter the Index number and as output parameter a record variable of type TKeyData which receive the fields that you see in the image.
Besides the previously mentioned fields there are obtained also other related fields, namely:
Status: The registration status of the key. This may be:
1) Unregistered: Meaning the lack of registration. There are no key registered for this Index. (not functional)
2) Moved: The key was marked to be moved to another computer (not functional).
3) Expired: The authorized period finished for a trial or temporal key. (not functional)
4) Registered: The key is registered and functional.
EndDate: Date ending the authorized period by a trial or temporary key.
Primary: Is true when dealing with a primary registration. The first recording made for a key in the OLM is the primary registration, the following being made to complete the number of authorized users are secondary.
DateBacked: Takes the same value as the property of the same name; True if the system date was turned back. If so, you would take some action, like terminate the program or call the OnlineCheckDate() method which compares the system date with the obtained from internet. See in the the method GetKeyData().
TooManyInstances: True when the number of instances running on the computer exceed the number of authorized instances. If so, you would take some action, like terminate the program.
Key: The registration key registered for the given Index.
Primary ICode: Checksum from the Primary InstallCode. Only usable for secondary registrations.
Primary Installcode: InstallCode from the primary registration. Only usable for secondary registrations. This code and the previously mentioned ICode are saved together with the registration key in order to compare it later with the ICode (checksum) included into the key. See in the image below how is configured the key data into a secondary registration.
WHAT IS A GENERIC KEY?
Normally a key is generated to be applied only for one computer where the InstallCode match with the one used to generates the key. But, if you check the "Generic key" checkbox, then will be generated a generic key which will serve to register any computer, but in this case limited to the same version, so if you change the version property in your application this key will not serve for this new version. This kind of key can be useful for massive registrations but for another use it is not recommended.
I tried to make this help as clear and complete as possible, however they may have some issues not covered by this documentation. If you think I have missed something, or found errors, or have any idea that might be useful to improve this help, please let me know.
Alcides Valega Author of AVLock SIMPLE |
