Before Install the OLM
Items covered in this topic
This section is not for users of the free version which does not come with the OLM, if this is your case you can skip this topic and the next and go directly to the examples.
There are two OLM versions: The Basic OLM that comes with AVLock Standard and the Advanced OLM that comes with versions of AVLock Professional and Developer. Below we can see the folders and files scheme generated when you installed the package:
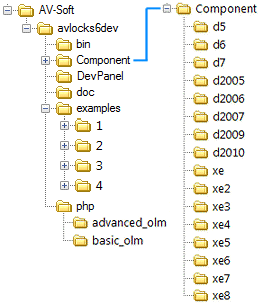
The OLM is located in the "php" folder. Each version with its corresponding olm.zip file in its own folder.

To install the OLM you will need:
1. A hosting account, preferably Linux with cPanel, PHP v5.3 or higher with mysqli and MCript extensions.
2. If you have the advanced OLM you will need to create a MySql database on your server (hosting account), or also you could use an existing database.
3. Copy to your web server the OLM PHP scripts. These are in compressed format in the olm.zip file inside the php folder.
1. A Hosting Account
You will need a hosting account, preferably Linux-based with CPanel. The CPanel is accessed from a web browser with the following URL: http://<your-domain>: 2082. Here <your-domain> must be replaced by the domain that is assigned to your hosting account.
Also may be useful a FTP client like Firefox FireFTP.
2. A MySql Database
If you already have a MySql database, you only need to remember the database name, the user name and password.
In order to create a database go to the Databases section and select the "MySQL Database Wizard".

You will access to the wizard to create a new database:
In the step1 enter the database name, in the example we entered "mybase".

After clicking "Next Step" is shown the Step 2 form where you must create the user name and password associated with the database, in the example we set "mybase". It is practical to place the same name as the database.
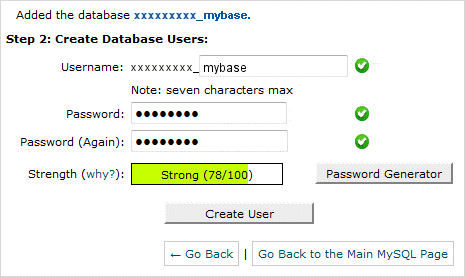
By clicking "Create user", the user is created and passed to the next screen (Step 3) where we assign user privileges. Select "ALL PRIVILEGES" as seen in the image below.
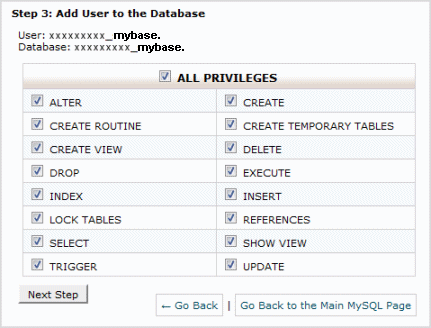
After clicking "Next Step" we go to the last screen (Step 4). We are shown the name of the database set and the user name associated with it.

3. Copy OLM files to your server
The files to be copied are PHP scripts that come in compressed format in the file olm.zip within the php folder.
Enter your CPanel hosting and go to the "Files" section and there select "File Manager".

The file manager window opens. Below in the image we have highlighted the options that will be used. Here not all folders are shown, only those that interest us for the task will perform. When you open the administrator will not see the "olm6" folder or the file olm.zip since this screenshot was taked after that they has been created.

NOTE: To avoid users that navigate your site see the files in folders that have no index.html or index.php files you must add a line to your .htaccess file in the public_html folder, if there is no such file can create and add this line. The line to add is:
Options -Indexes
|
Click on the "public_html" folder and then click on the "New Folder" icon.
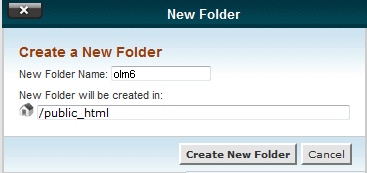
Here you enter the name of the folder that will be created. In this case put "olm6" and click on "Create New Folder". In moments we see in the file manager the new created folder, click on it to select.
Once selected the "olm6" folder, click the "Upload" icon. The following screen will be shown:
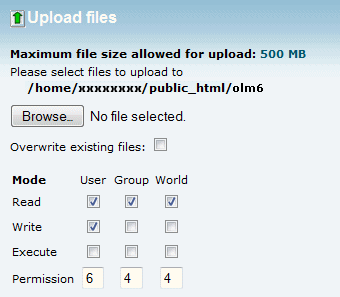
Leave the options unchanged and click "Browse". From the file manager select the file olm.zip within the php folder. A progress bar will shown the progress of the operation while the file is uploaded. Once finished you will see the file olm.zip file in the /public_html/olm6 folder.
Now you must uncompress the the olm.zip file, then select it and click the "Extract" icon. You will see the following screen:
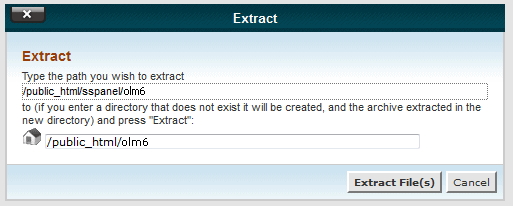
Verify that the references are correct and click the "Extract File (s)" button. In moments you will see a list of files extracted.
If you installed the advanced OLM will have the following files scheme on your server:
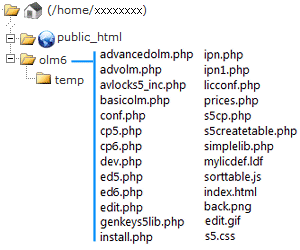
If you installed the basic OLM will have the following files scheme on your server:

IMPORTANT NOTE: If you have the Standard version of AVLock and want to use the basic OLM, before to use it, you will need to modify a line of code in the file basicolm.php.
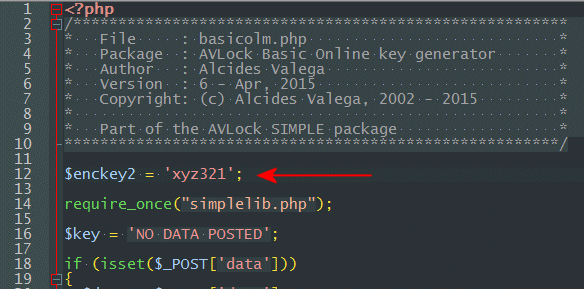
You must set the $enckey2 variable with an encryption key that must match with the value set to the encryptionkey2 AVLock property in your application. See in example1 the corresponding line in the Initialization section of the unit1.pas unit.
If you have the Professional or Developer version will not need to assign this variable because in this case this value is taken from the conf.php file where the $enckey2 variable is set with the installation process covered in the next topic. The basicolm.php file included in the advanced OLM differs in a line with the basic OLM. Below we can see that the line $enckey2 = 'xyz321'; was replaced by require_once ("conf.php"), so in this case should not make any changes.

I tried to make this help as clear and complete as possible, however they may have some issues not covered by this documentation. If you think I have missed something, or found errors, or have any idea that might be useful to improve this help, please let me know.
Alcides Valega Author of AVLock SIMPLE |