EXAMPLE 1
Items covered in this topic
Variables msg1, msg2 and barpos
Example Description
Let's start by explaining a very simple example but uses the general scheme we use in all examples.
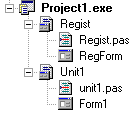
Our example is composed of two forms:
- The main form "Form1" would be the main form of your application.
- The "Register" form that is where the user can perform the registration process and see its Status.
Below we see the Example1 scheme into the Delphi IDE:
The Main Form "Form1"
As we can see in the picture below we have three buttons to access three modules. each of these modules provides access to application functionality that can be controlled by AVLock. In this example we have only three modules, but could control up to a maximum of 12.
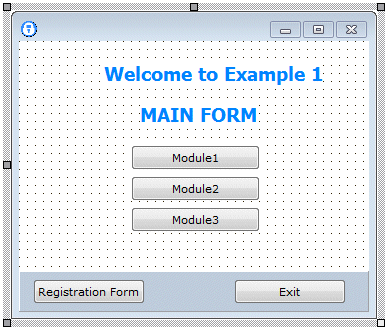
We also have the "Registration Form" button that will lead us to the registration form. This will be explained in detail later.
The Code of "Form1"
Below is the interface section of unit1 which is the unit associated to Form1. We highlighted with another color the elements that we will explain below.
unit Unit1;
interface
uses Windows, Messages, SysUtils, Classes, Graphics, Controls, Forms, Dialogs, StdCtrls, ExtCtrls, AVLockS6;
type TForm1 = class(TForm) Label1: TLabel; Label2: TLabel; Panel1: TPanel; BtnReg: TButton; BtnExit: TButton; btn1: TButton; btn2: TButton; btn3: TButton; procedure BtnRegClick(Sender: TObject); procedure FormCreate(Sender: TObject); procedure BtnExitClick(Sender: TObject); private { Private declarations } public { Public declarations } procedure SetModules; end;
procedure GetRegStatus; procedure StartTrial(mode:byte); procedure DoRegister(force:boolean);
var Form1: TForm1;
AVLock : TAVLockS6;
KeyData : TKeyData;
msg1,msg2:string; barpos:integer;
|
In the uses clause we include a reference to AVLockS6 component. This is enough, it is not necessary to place the control on the form. Also are the procedures SetModules, GetRegStatus and DoRegister and the global variables AVLock, keydata, msg1, msg2 and barpos. Them are declared as global because also will be used for the registration form.
We begin by explaining the AVLock statement:
Variable AVLock
AVLock : TAVlockS6;
This variable declare a reference to AVLock component, then we instantiate it as object in the initializartion section with the following line:
AVLock:=TAVLockS6.Create(nil);
After instantiating the component is configured by assigning the properties that we consider suitable for the case. Below you can see the code for initialization and finalization sections:
initialization
AVLock:=TAVLockS6.Create(nil); with AVLock do begin InstallCodeSources := Removable_Disk; RegPath := ExeDir; RegFolder := ''; AppID := 12301; EncryptionKey := 'abc123'; EncryptionKey2 := 'xyz321'; AppName := 'MyApp'; AppVersion := '1.0.0'; WebHost := 'www.av-soft.com'; TimeHost := 'time-a.nist.gov'; OlmPath := '/olm6'; OlmBasicScript := 'basicolm.php'; OlmAdvScript := 'advolm.php'; InstancesCtrl := True; end;
finalization freeandnil(AVLock);
|
En este caso asignamos las siguientes propiedades:
ASIGNACION |
DETALLE |
InstallCodeSources := Removable_Disk; |
The InstallCodeSources property determines how the value of the property is obtained InstallCode. Values can be Machine_Data, User_Data, or Removable_Disk. We recommend using Removable_Disk that calculates the InstallCode based in the serial from the disk where is located the executable of the application. This way allow the application to be installed as portable.
|
RegPath := ExeDir; |
This property determines where will be saved the registration data file * .avr. The options are CommonDocuments, ProgramData, RoamingAppData, LocalAppData, ExeDir, Other. The option used in the example is ExeDir does that the * .avr file were saved in the folder of the executable.
|
RegFolder := ''; |
Optionally enter there the value of the folder where you want the registration data file * .avr is saved. Will be better understood with an example. Assuming the application executable is located in c:\ myapp and RegFolder='myfolder' and we have RegPath=ExeDir, the * .avr file will be saved in c:\ myapp\myfolder.
|
AppID := 12301; |
The AppID is a number that identifies your application. You must place a different number for each application controlled with AVLock.
|
EncryptionKey := 'abc123'; |
The EncryptionKey property is a keyword that is used with the algorithm Rijndael to encrypt data associated with registration. Put here a string of 8-16 characters.
|
EncryptionKey2 := 'xyz321'; |
Only necessary if the OLM is used. The EncryptionKey2 property is a keyword that is used with the Rijndael algorithm to encrypt data transferred between the OLM and the application. Put here a string of 8-16 characters. Must match the value of the following variables in the OLM files: with $encryptionkey2 in genkeys5lib.php and with $enckey2 in conf.php.
|
AppName := 'MyApp'; |
This is the name that identifies the application.
|
AppVersion := '1.0.0'; |
Is the application version.
|
WebHost := 'www.av-soft.com'; |
It is the domain of your website. Only necessary if the OLM is used.
|
TimeHost := 'time-a.nist.gov'; |
It is the server to get the current system date.
|
OlmPath := '/olm6'; |
The server folder where the OLM is located. Only necessary if the OLM is used.
|
OlmBasicScript := 'basicolm.php'; |
It is the name of the script used for the Basic OLM. Only necessary if the OLM is used.
|
OlmAdvScript := 'advolm.php'; |
It is the name of the script used for the Advanced OLM. Only necessary if the OLM is used.
|
InstancesCtrl := True; |
If True, the application instances are controlled. The default value is False. |
Variable KeyData
It is a variable that is declared of the TKeyData type. This type is defined in AVLock as a data record with fields that define the registration status of an application. Its definition is shown below:
TRegStatus = (Unregistered, Moved, Expired, Registered); TKeyType = (Trial, Temporal, Permanent, Unregister, UnregisterAll);
TKeyData = record Status: TRegStatus; KeyType: TKeyType; Startdate: TDate; EndDate: TDate; Days: word; DaysLeft: word; Users: byte; Instances: byte; Primary: Boolean; DateBacked: Boolean; TooManyInstances: Boolean; Values: string; Key: string; ICodeP: string; InstallCodep: string; StrStatus :string; end;
|
Variables msg1, msg2 y barpos
In these variables we prepare messages about the registration status to be shown on the registration form later.
The GetRegStatus procedure
Here is the code for this procedure:
procedure GetRegStatus; var s:string; day:integer; ok:boolean; begin AVLock.GetKeyData(0,KeyData); s:=''; msg1:=''; msg2:=''; barpos:=0; ok:=False; case keydata.Status of Unregistered: s:='Not registered'; Moved : s:='Moved to another computer'; Expired : s:='Expired'; Registered : begin ok:= (keydata.DaysLeft>0); if ok then s:='Registered ' else begin keydata.Status := Expired; s:= 'EXPIRED'; end; if (keydata.KeyType = Permanent) then msg1 := 'NEVER EXPIRES' else begin day:=keydata.Days-keydata.DaysLeft+1; barpos:= trunc(day*100/keydata.Days); msg1 := 'You are in the day '+inttostr(day)+' of '+inttostr(keydata.Days); msg2:=inttostr(keydata.DaysLeft)+' days left'; end; if ok then case keydata.KeyType of Trial : s:=s+'as Trial '; Temporal : s:=s+'as Temporal '; Permanent : begin s:=s+'as Permanent, no time limit.'; end; end; end; end; keydata.StrStatus := s; end;
|
The first line invokes the GetkeyData method that reads the registration data of the application from the *.avr file then sets them to the KeyData fields.
AVLock.GetKeyData(0,KeyData);
GetKeyData takes two parameters (0, KeyData). The first is the corresponding module in the registration data to be read, normally is used only one index with zero as in our case, except on rare occasions, when for example you want to control more than 12 modules in the implementation would need to record two index, 0 and 1 and also would take two registration keys. In our examples we will use only the index zero.
After that, KeyData fields are analyzed and prepare text messages with details on the registration status to be shown on the registration form. So, the variables msg1 and msg2, barpos and KeyData.StrStatus are set with descriptive messages about the registration status, and barpos take an integer value with the position into the trial period.
The DoRegister procedure
Below is the code for this procedure:
procedure DoRegister(force:boolean); var F : TRegForm; begin if not AVLock.IsLocal then begin showmessage('Not Allowed from a remote drive'); exit; end; StartTrial(0); if (force or (keydata.DaysLeft < 15)) then begin F:=TRegForm.Create(nil); //Create the registration Form F.EdIcode.Text := AVLock.InstallCode; F.lstatus.Caption := keydata.strstatus; try F.ShowModal; finally FreeAndNil(F); end; GetRegStatus; end; if (keydata.Status <> Registered) then begin showmessage('Not Registered'); Application.Terminate; end; end;
|
This procedure allows the user to access the registration form to see the current status and proceed to register the application.
The condition not AVLock.IsLocal prevent to access the form remotely.
It may be that we want to display this form automatically when the application starts in the case that the application status is Non-Registered or the trial period is about to expire or has expired. But we would also like to invoke it unconditionally, for example from a button. So we've placed the force parameter that allows us to do. If (force = True) the registration form is displayed directly without seeing the state of registration, but if (force = False) the registration form will be displayed only if the following condition is met:
if (force or (keydata.DaysLeft < 15)) then
The condition (keydata.DaysLeft < 15) makes the form is displayed when there are less than 15 days to expire, if the application is not registered or expired remaining days will be zero and the condition is fulfilled.
The SetModules procedure
Below is the code for this procedure:
procedure TForm1.SetModules; var s:string; begin s:= keydata.Values+'000'; btn1.Enabled := (s[1]='1'); btn2.Enabled := (s[2]='1'); btn3.Enabled := (s[3]='1'); end;
|
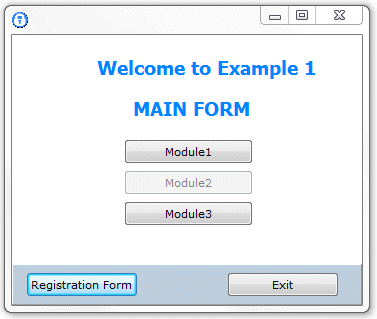
With this procedure we activate or deactivate the modules buttons according to the positions of the digits in the KeyData.Values field. As in the example we started the trial period with Values = '101'. The first and third module is enabled and the second is disabled, as shown below:
Start the Trial Period
In the software market has become popular the mode "try before buy", so the potential buyer has the opportunity to try the product for a certain time called "Trial Period". AVLock can implement in your application the trial period safely. Let's look at the different methods used to implement it.
The StartTrial procedure
Below is the code for this procedure;
procedure StartTrial(mode:byte); begin GetRegStatus; if not (mode in[1..3]) then exit; if (keydata.Status = Unregistered) then begin case mode of 1: AVLock.StartTrialBare(0,1,30,'101'); 2: AVLock.StartTrialBasic(0,1,30,'101'); 3: AVLock.StartTrialAdv(0,1,1,30,'101'); end; GetRegStatus; end; end;
|
This procedure first invokes GetRegStatus to get the registration data, then, if the state is Non-Registered starts the trial period. Take the 'mode' parameter that determines the mode in which the trial period will begin. These are the options:
For (mode = 0)
The trial period does not start. This mode is used when you do not want the trial period starts, for example, when we do not use the OLM and we want the application starts in the user's PC as Non-Registered, then the user should apply for a registration key to start the trial period .
For (mode = 1)
The trial period starts with the StartTrialBare function that does not use the OLM to save the registration data which is only saved locally on the PC. This mode is not recommended to be unsafe because that removing the *.avr file with the registration data will restarts the trial period. The method is declared as follows in the source code of AVLock:
function StartTrialBare(Index, Instances, Days: word; Values: string): Integer;
For (mode = 2)
The trial period begins with the StartTrialBasic method using the basic OLM to save the registration data which also is saved locally on the PC. This method is safe because if the registration data file *.avr is removed, this is rebuilt again based on the data stored in the OLM. This method is safe and is recommended for those with AVLock Standard Edition. The method is declared as follows in the source code of AVLock:
function StartTrialBasic(Index, Inst, Days: word; values: string): string;
For (mode = 3)
The trial period begins with the StartTrialAdv function that uses the advanced OLM to save the registration data and also saves it locally on the PC. This method is safe because if the registration data *.avr file is removed, this is rebuilt again based on the data stored in the OLM. This method is safe and is recommended for those with AVLock Professional Edition or Developer. The method is declared as follows in the source code of AVLock:
function StartTrialAdv(Index, Users, Instances, Days: word; Values: string): string;
Meaning of the parameters:
PARAMETER |
MEANING |
Index |
Normaly use (Index=0) |
Users |
Number of users allowed. Only for Advanced OLM |
Instances |
Number of instances of the application that may be executed from the same executable file. |
Days |
Days of the authorized period. (Days=65535) meaning unlimited |
Values |
Cadena hexadecimal de tres caracteres que permite controlar los módulos de la aplicación. |
Finally the GetRegStatus method is invoked to get again the registration status after having generated the trial period.
What follows is a brief practice with this example to understand better how works each one of the StartTrial options.
Testing with StartTrial(0);
In this case the first line DoRegister within the procedure should be as follows:
StartTrial(0);
Let's run the application and see what happens.
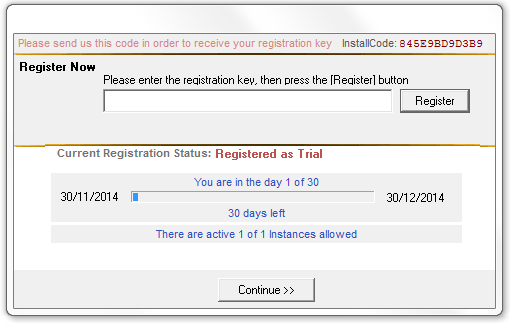
With (mode = 0), the trial period will not start and the application state will be Not-Registered and the registration form will be displayed as seen in the image below:
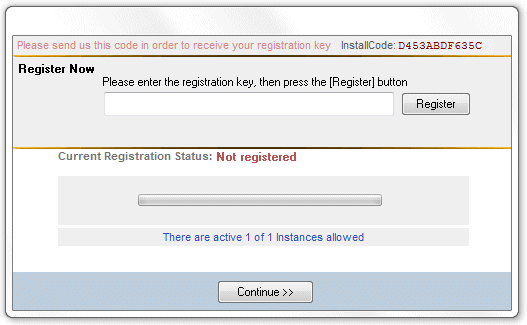
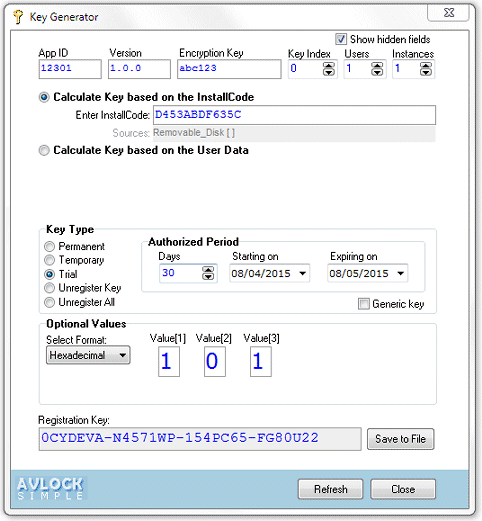
This is recommended for users of the Standard version in the case of not having a hosting account where install the basic OLM. However, this mode will require thet the user send you the InstallCode for you, then you calculates a registration key for the trial period and send it to the user in order to register the application. Below we will follow this step by step process.
1.The user sends the InstallCode of his PC. In this case 0856EB896EFC
2. You with the KeyGen utility calculates the registration key and sends it to the user
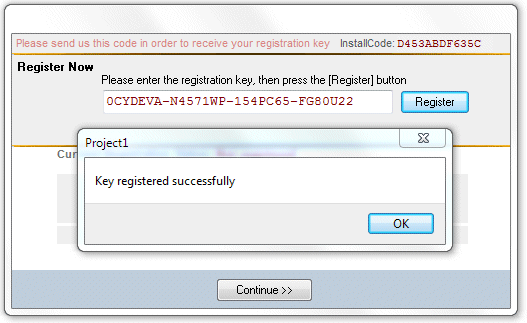
3. The user registers the application by entering the key and clicking on the Register button..
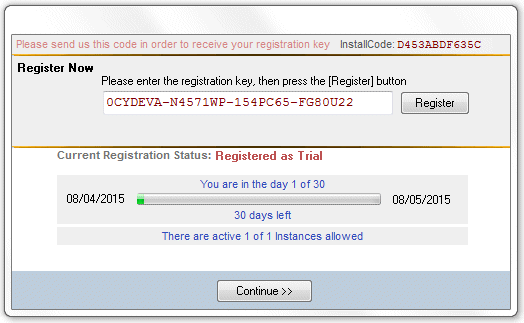
After clicking "Ok" the user can see the new registration status. The trial period has been initiated.
Then, with the "Continue" button accesses the main form of the application:

In this case the process is safe. If the *.avr file is deleted, the application state becomes Non-Registered. And if the registration key is again applied the *.avr file is rebuilt in the same position within the trial period, being all the same as it was before deleting the file.
Testing with StartTrial(1);
To try again delete the file *.avr file from the app folder, EYPMKNUC.avr in my case. Then we change the first line in the procedure DoRegister by the following:
StartTrial(1);
Reviewing the code for the StartTrial procedure we see that with the parameter (mode = 2) the trial period begins with the StartTrialBare method. Below we can see the corresponding line.
2: AVLock.StartTrialBare(0,1,30,'101');
The parameters are (index=0), (instances=1), (days=30), (values='101').
We compile and run again and see that directly is shown the main form of the application with the modules Module1 and Module2 activated, which means that the trial period has been started automatically when we run the application. Reviewing the app folder we see that the *.avr file has been generated again.
This mode is very practical and works well, but unfortunately is not secure. If you miss a few days and eliminates again the *.avr file, will see that this is recreated enabling a new trial period. Although this option is not secure some people prefer it because it is automatic and does not require the OLM. If you want to use it, you should configure the initialization section with the appropriate values for InstallCodeSources, RegPath and RegFolder in order to generate the *.avr file outside the app folder and thus hide it from the user's view. The Configurator utility can help you to choose the appropriate parameters.
Testing with StartTrial(2);
To try again delete the *.avr file from the application folder. Then change the first line in the DoRegister procedure by the following:
StartTrial(2);
In the StartTrial procedure we see that with the parameter (mode = 2) the trial period begins with the StartTrialBasic method. Below we see the corresponding line.
2: AVLock.StartTrialBasic(0,1,30,'101');
The parameters are (index=0), (instances=1), (days=30), (values='101').
To use this option you must have installed the basic OLM. For more details see (Preparation> Install the OLM).
Then execute the application again and see that the trial period starts automatically and seeing the app folder we found the *.avr file again. But now, seeing into the server we found there a new file created into the \temp folder, as shown below:

This file contains a copy of the registration data so that if after a few days we delete the *.avr file, this will be created again with the data from the file in the \temp folder, and the position within the trial period will be the same as before deleting the *.avr file. For example if missing five days to expire, after deleting the file and restart will still missing five days.
Testing with StartTrial(3);
To try again we delete the *.avr file from the application folder. Then we change the first line in the DoRegister procedure by the following:
StartTrial(3);
In the procedure StartTrial we see that with the parameter (mode=3) the trial period starts with the StartTrialAdv method. Below we see the corresponding line:
2: AVLock.StartTrialAdv(0,1,1,30,'101');
The parameters are (index=0), (users=1), (instances=1), (days=30), (values='101').
To use this option you must have installed the advanced OLM. For more details see (Preparation> Install the OLM). This option is for users of the Professional and Developer editions that come with the advanced OLM. Also if you has the Free edition or Standard edition, you can also do this practice using the OLM from the AV-SOFT site. The example is configured to access it. The following code in the initialization section defines the access to the OLM.
WebHost := 'www.av-soft.com';
OlmPath := '/olm6';
OlmBasicScript := 'basicolm.php';
OlmAdvScript := 'advolm.php';
To access your own OLM change the first two parameters with your own server access data.
We run the application again and the trial period starts automatically, and the *.avr file is created again, but now the registration data are stored in the MySql database of the Advanced OLM.
We have three ways to access the database of the advanced OLM:
1. With DevPanel utility. See in the image below the record 2139 that we generated with our example:
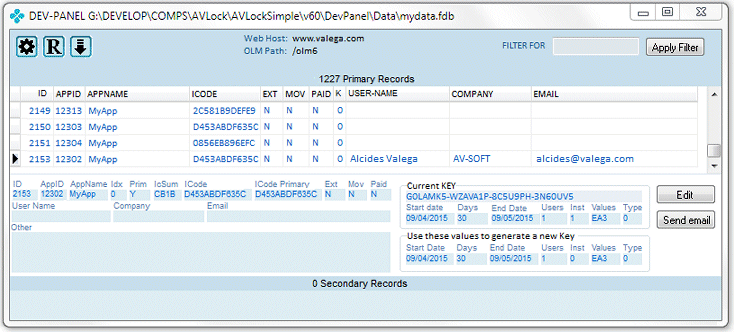
For more information see the section (Preparation > The Dev-Panel).
2. With cp6.php control panel that is part of the advanced OLM. Access with the password "mypass".
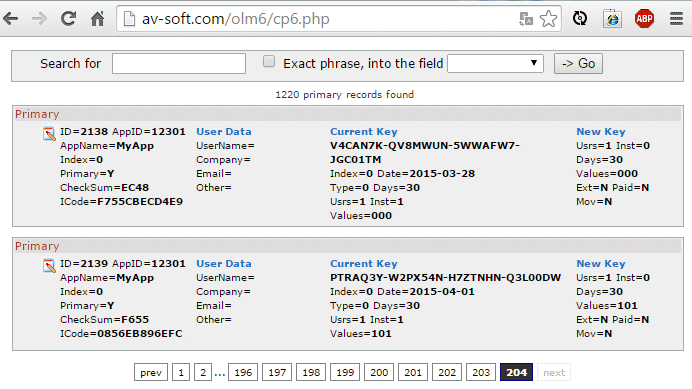
Here we see again the 2139 record generated by our example. More data in (Preparation> Panels).
3. With the control panel s5cp.php from the previous version 5.x. Access with the password "abc123".

We see again here the record 2139 we generated with our example.
As we can see in these images, in addition to the normal registration data, there are fields that correspond to the user's own data such as UserName, Company, UserEmail, etc. In Example 2 we will see in detail how to access and modify these data from the application.
Below we see running the main form of our example that was finally registered with the advanced OLM:

Now we click on the "Registration Form" button to invoke the registration form. In the OnClick event handler of the button we have the following code:
procedure TForm1.BtnRegClick(Sender: TObject); begin DoRegister(True); end;
|
We see that the registration form is accessed with a call to the procedure DoRegister procedure: DoRegister (True), we do so with the parameter (force=True) to access unconditionally. Below we see the registration form showing the status and progress within the trial period.
